Dissection of the ventilation system of a locust
Class practical
Dissections provide information that can complement the information obtained from investigations of living animals. For a complete account of a process such as ventilation, students will need to understand both structure and function in the systems observed.
Lesson organisation
This will depend on the number of locusts, microscopes and dissecting equipment you have available and also on your students’ willingness to take part in a whole animal dissection. You could deliver this as a demonstration dissection if you have a suitable video camera and display screen – perhaps with a student carrying out the work with guidance from you and their colleagues working from the student notes.
Apparatus and Chemicals
For each group of students:
Adult locust, living (Note 1)
Specimen tube, 1
Ethanol, 70% IDA, Hazcard 40A (Note 2)
Stereomicroscope
Microscope, monocular up to x400 magnification
Adult locust, dead
Tray with layer of hard wax (Note 3)
Dissecting kit – fine-pointed scissors, 1; pins, 8; forceps, 1; seeker, 1
Volume of insect saline or water (Note 4)
Watchglass, 1
Microscope slide, 2
Methylene blue, 0.5% aqueous (Note 5)
Coverslip, 2
Mounted needles, 2
Pipettes, 2
Optional
Impatiens, (busy Lizzie), 1 fresh leaf (Note 6)
Health & Safety and Technical notes
Handling living locusts – take care when cleaning out the cage as skin and droppings in the dust may provoke an allergic response (Note 1).
Ethanol IDA, Hazcard 40A – keep away from naked flames and avoid skin contact (Note 2).
Methylene blue (refer to Hazcard 32) is harmful if swallowed and, as a solid, by skin contact and by inhalation. 0.5–1% solutions are low hazard (Note 5).
Scalpels and dissecting scissors
1 Living locusts: For more details refer to the CLEAPSS Guide L56 – 'Housing and keeping animals'. A purpose-built locust cage or a larger frame cages (described in section 7.5.3 of Guide L56) is suitable for keeping locusts, provided that they can be maintained at temperatures between 25 and 34 °C (ideally 28-34 °C by day and 25-28 °C at night). An electric light bulb next to the cage may provide enough heat. Provide twigs or other surfaces for the insects to climb and to carry out their final moult into the winged stage. Their diet consists of almost any type of vegetation: grass, other leaves (including leaf vegetables such as Brussels sprouts), seeds, root vegetables, bran and cereal products. Water is only necessary when the insects are fed exclusively on dry products such as bran. Maintaining a shallow dish with a pad of paper towelling or cotton wool in a moist condition should provide an adequate source of water.
Locusts should not be maintained in continuous culture because particles from their skin and droppings may provoke an allergic response in those caring for them. If locusts were maintained throughout the year, the likelihood of allergies developing would be increased. For this reason, the sand tubes in commercial cages should not be used and the holes in the flooring should be blocked off with suitably-sized corks or bungs. For short-term studies (until the adults reach the end of their natural lives after a few weeks), the risk of allergic reactions is small. Nevertheless, care must be exercised when cleaning out the cages to avoid raising dust. It is safer to buy in locusts when needed rather than attempt to maintain a permanent culture. Specialist locust suppliers may be cheaper than education science suppliers.
2 Ethanol IDA, (see CLEAPSS Hazcard), is HIGHLY FLAMMABLE (flash point 13 °C) and HARMFUL (because of presence of methanol). No Bunsen burners are required during this practical so the risk of ignition is low. If the technical staff place the ethanol in the specimen bottles in preparation, then the risk to students in handling the liquid is less.
3 There are a variety of dissection boards available. Some suppliers offer boards made from soft wood (or with a cork insert) into which you can insert awls (or dissecting pins). These boards typically have raised edges to retain fluids. Alternatively you can use old enamel pie dishes or heavy-gauge aluminium dishes with sloping sides and fill these with molten black wax (eg, from Philip Harris; A72291 or A72308).
4 Insect saline is 0.9 g sodium chloride in 100 cm3 of distilled water. Sodium chloride, is described as LOW HAZARDd on the Hazcard.
5 The CLEAPSS Recipe Card gives a slightly different recipe – but this procedure suggests 0.5% aqueous stain (0.5 g in 100 cm3 of water). At this concentration, methylene blue stain is low hazard. The CLEAPSS Hazcard highlights that solid methylene blue is harmful if swallowed and by inhalation and by skin contact. Any general stain will do in place of methylene blue. Its purpose is to make more features of the specimen visible under the microscope.
5 Preparation of leaf midrib tissues does not take long and could be delegated to one member of the class.
Ethical issues
This procedure involves dissection of an animal (a locust – an insect) for the purposes of viewing directly its well-understood anatomy. There are benefits in terms of learning opportunities specific to the ventilation system of this organism and also general techniques of handling dissection material, interpreting what is seen and preparing temporary slides.
Most of the literature relating to the ethics of dissection relates to vertebrates rather than invertebrates. It is important that the locusts are treated with respect and not unduly stressed by handling – students (and teachers) should handle them calmly and with care. It may be prudent to avoid dissecting locusts if students have taken an active role in caring for them. There is more general guidance on dissection for educational purposes in the CLEAPSS Laboratory Handbook section 14.7 Dissection.
Procedure
SAFETY: Be aware of any allergic responses to the locusts (Note 1).
Avoid sources of ignition and skin contact with ethanol IDA (Note 2).
Preparation
a Order a suitable number of locusts – living and cadaver (Note 1). Practice handling the living locusts to be able to get them quickly into syringes with as little fuss as possible.
b Set up a suitable number of stereomicroscopes and monocular microscopes.
c Check that all dissecting equipment (trays and tools) was cleaned appropriately before storage.
d Prepare specimen bottles to collect locust tissue (Note 2) and make up methylene blue stain (Hazcard 32 and Note 5).
Investigation: stage 1
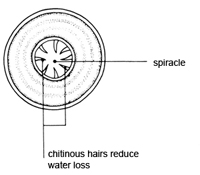
e Put a living adult locust into a syringe barrel or specimen tube so that its movements are restricted, and place it under a stereomicroscope. Look at the thorax and abdomen for apertures through which it is likely that gas could pass.
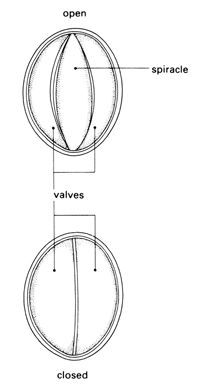
f Focus on the large aperture (spiracle) on the second thoracic segment just behind and above the insertion of the leg. Observe its movements and record carefully what you see.

Investigation: stage 2
g Fix a dead adult locust to the stage of a monocular microscope and examine the abdominal and thoracic spiracles more closely. You will need strong, oblique, top lighting and a very low magnification, but you should be able to distinguish between a true spiracle and a pit or depression.
h Record the location of the spiracles on a simple outline sketch or digital photograph for future reference.
i Place the dead locust in its normal resting position in the centre of a shallow dish which has a layer of hard wax at the bottom. Fix it by means of pins through the legs and thorax. Cut off the wings if they get in the way.
j Pull back the tip of the abdomen with forceps, stretching it slightly, and insert a pin to hold it back and down. With fine-pointed scissors, pierce the exoskeleton between two segments at about the position shown in this diagram. Cut down between the segments on one side and then continue the incision forward to the head along the dotted line shown. As you cut, let the lower blade of your scissors pull the locust up slightly. In this way you will be less likely to damage the internal organs.
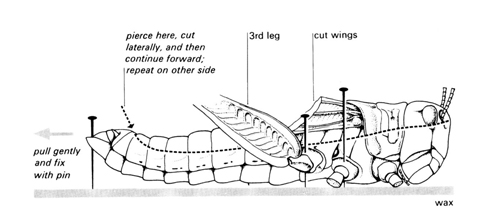
k Make a similar cut on the other side and carefully remove the strip of exoskeleton from the animal so that you can see the organs inside. (Use a blunt seeker to separate the strip from the underlying tissues – the heart should remain attached to the strip.) Preserve the strip in a tube containing 70% ethanol if you wish to study locust hearts in more detail at any point.
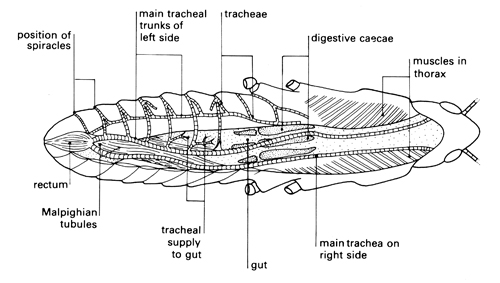
l Flood the dissection with insect saline or water (Note 4) and explore the cavity and its contents with a seeker. Identify the most prominent organ – the brown alimentary canal (or gut). See diagram below.

m You are looking particularly for structures filled with air which show up as tiny silver threads. (You also get this effect with empty glass tubes under water – they look silver and their surface acts like a mirror.)
n Examine the many silver threads (tracheae) and the associated organs with the aid of a hand lens and stereomicroscope. Try to trace the possible paths of gases moving into or out of the body. Pull the mid-gut upwards gently and look at the air-filled tracheae from the side.
o Compare your dissection with a few others in the group, as the number and size of air sacs can vary considerably from one locust to another.

Investigation: stage 3
p With scissors, remove a small portion (2.5 mm long) of the mid-gut or hind-gut together with some tracheae. Place it in a watchglass containing a little water.
q Cut the portion of gut longitudinally, open it out flat, wash away all trace of the gut contents and mount the specimen in water on a slide beneath a coverslip.
r Observe it under low power and high power. The tracheae will stand out clearly because they contain air and so appear dark grey or silver in transmitted light.
s Remove the coverslip and put a drop of aqueous methylene blue on the tissue.
t While waiting for the stain to take effect, take a small leaf of Impatiens (busy Lizzie), cut out the midrib, tease it into shreds with needles, mount it in a drop of water and squash it firmly under a coverslip. Examine under low power and see if you can find any structures that have a ringed appearance similar to that of tracheae.
u Return to the preparation of the gut wall, wash away the excess stain and mount in water. Look for nuclei and other details of a cellular structure surrounding the tracheae.
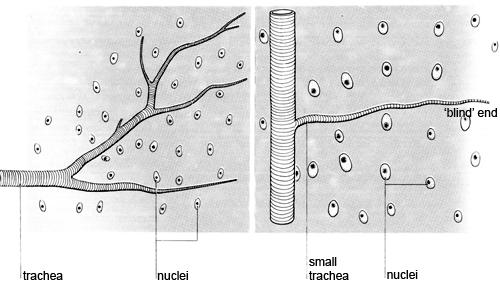
v Compare what you can see with the diagrams below showing part of a tracheal system, and a system that has been immersed in ethanol overnight.
Teaching notes
In this, as any good dissection, the target is to open the animal in a way that does minimal damage, and carefully displace its internal organs. Students should only remove tissues that obscure more important structures or are required for further examination (for example, using a microscope).
Questions on the student sheet provide a structure to guide them to record their observations and interpretations of the procedure.
Locusts, like leaves, are covered with a waterproof cuticle. Leaves are perforated by stomata – small holes through which gases can pass. The aim of the first investigation is to study the shiny, hard exoskeleton of a locust to find out if there are pores through which gases might pass, and to see if gases could pass through the mouth of the locust into any internal breathing system. The movement of spiracles may be hard to see because they are opened only at intervals when the locust is at rest. This contributes to water conservation for the insect. The thoracic spiracles are opened and closed by two chitinous valves, whereas the abdominal spiracles have no valves. Students may notice that the opening of the spiracles is synchronised – anterior spiracles are open when the posterior spiracles are closed and vice versa. This permits a uni-directional passage of air from anterior to posterior in the insect which increases the efficiency of the tracheal system.
The second part of the investigation shows that there are tracheae connecting spiracles to internal organs. The thread-like structures that permeate organs such as the gut are easily seen using a microscope. The notes and questions encourage students to record what they see and begin to suggest mechanisms for how the anatomical structures are involved in gas exchange.
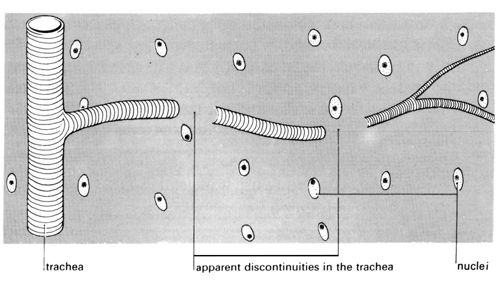
The third part of the investigation reveals what happens within the organs and tissues. The smallest branches of tracheae appear to end abruptly. The presence of fluid in the tracheae obscures the fine terminations of the system. Tracheoles cannot be seen in temporary, unstained preparations. Pieces of gut wall immersed overnight usually have the appearance shown in diagram 4. Tracheae branch into tracheoles which can eventually penetrate individual cells.

Electron micrographs (see diagram above) show that the blind ends of tracheoles lie between the muscle fibrils in the flight muscles. Oxygen diffuses directly from the tracheoles and oxidative phosphorylation occurs in the mitochondria, ensuring an efficient supply of ATP to the muscle fibres to provide energy for contraction. During inactivity, oxygen dissolves in the fluid (mainly water) in the end of each tracheole, before diffusing out into the tissues. The fluid acts as a diffusion barrier between the cells and oxygen in the tracheoles. During muscular activity, the fluid disappears and gaseous oxygen diffuses directly and more rapidly through the cytoplasm to the muscle cells. The fluid is withdrawn from the tracheoles by osmosis into rapidly metabolising cells that have accumulated osmotically active waste products.
There is further information about the function of the tracheoles as part of a gas exchange system in the answers to the questions on the student sheet.
The final question encourages students to consider the limitations on size for an animal that exchanges gas in this way. This could be a good point to introduce videoclips of films about giant insects and discuss the anatomical reasons why we need not fear such events! (See link below.)
Downloads
Download the student sheet ![]() Dissection of the ventilation system of a locust (394 KB) with questions and answers.
Dissection of the ventilation system of a locust (394 KB) with questions and answers.
Web links
www.youtube.com/watch?v=q2PLls02gOU
Link to trailer for the horror film ‘Them!’ – featuring giant ants that developed by mutation following an atomic blast. A light-hearted introduction to the subject of insect physiology – not one for the insect-phobics – but it might make a context for discussing why insects of such enormous size would not be able to sustain themselves in terms of ventilation for gas exchange (or, for that matter, supporting their bodies against the effect of gravity).
(Website accessed October 2011)
Related experiments
Modelling the human ventilation system
Using a spirometer to investigate human lung function
Investigating factors affecting the breathing rate of a locust