

Using a spirometer to investigate human lung function
Class practical
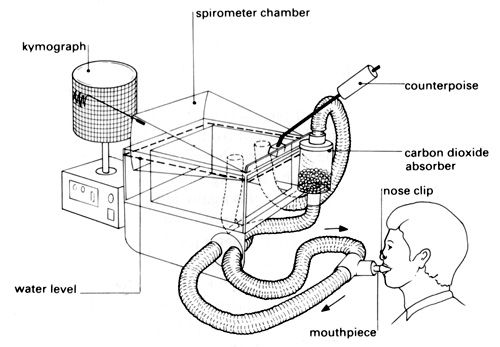
A spirometer is the standard equipment used to measure the capacity of the human lungs. There are several versions of this laboratory apparatus available, but all consist of a chamber (of capacity approximately 6 dm3) suspended freely over water and counterbalanced so that gas passed in or drawn out makes the chamber rise or fall. You can make a permanent record of the movements of the chamber either by attaching a pen to it and allowing it to write on a drum revolving slowly (kymograph) or by attaching a motion sensor which will convert movement into electronic signals that are then interpreted by your datalogging software.
These notes explain the working of a spirometer, so that students are aware of the apparatus and how it works. The notes include some of the hazards and risk control measures required for safe operation of the apparatus. We have also provided some example traces for your students to analyse and interpret. You could use these even if you do not have access to a spirometer, or if you feel it is too complicated to set up.
There are some hand-held versions of spirometers available – small devices that measure air flow and calculate volume electronically. For example, Philip Harris offer a ‘pocket spirometer’ at around £140 which can be used outside the laboratory for collecting data in the field, and PASCO produce a datalogging spirometer (Pasport Spirometer) for which you would need the Data Studio software, but it produces instant traces on screen.
Lesson organisation
Students should use a spirometer only under the direct supervision of a teacher. Never carry out an investigation on a human subject if you are not being supervised.
Apparatus and Chemicals
For the class – set up by technician/ teacher:
Spirometer and carbosorb
Disinfectant
Oxygen cylinder (optional for short investigations – see Notes 2 and 5 below)
Kymograph
or Motion sensor and datalogging software
Health & Safety and Technical notes
Student health: Give careful consideration to the selection of subjects – it may be helpful to know medical histories. Participation in school sports teams is usually a good indication of fitness.
1 Carbosorb/ sodalime: Refer to Hazcard 91 for more information about soda line and Carbosorb. Wear eye protection when handling these carbon dioxide absorbing chemicals; they are corrosive although safer to use than sodium hydroxide. For spirometers use granules of the size 5 to 10 mesh (similar to aquarium gravel) rather than 8 to 14 mesh (which has lumps similar in size to demerara sugar).
Ensure that the valve in the tubing connected to the spirometer is positioned so that air is always exhaled through the soda lime/ Carbosorb to avoid inhalation of any soda lime/ Carbosorb dust. Reduce this risk further by placing a small layer of polymer wool (as used in aquarium filters) at the inflow and outflow of the carbon dioxide absorbent chamber. Carbosorb (from VWR (see Suppliers)) has been treated with an indicator dye that changes colour (from pale brown to greyish white) to show when no more carbon dioxide can be absorbed. Indicating soda lime should be stored in a dark place to prevent colour fading. If there is any doubt about its condition, test a small sample with carbon dioxide to see if there is any further colour change.
2 Oxygen from cylinders: Oxygen forms explosive compounds with many oils and greases, so such lubricants should not be put on the connectors or regulators of oxygen cylinders or on the tubing connectors to spirometers. Use water or soap solutions only if you need to ease any of the connections between the apparatus and corrugated tubes. The risks of using ordinary oxygen compared with medical oxygen are insignificant.
3 Cleaning the spirometer: Disinfect the mouthpiece after each person has used it. Use a fresh solution of Milton and disinfect for 30 minutes, then rinse in water. Milton leaves no unpleasant aftertaste. If you need to disinfect more quickly, ethanol will disinfect in 5 minutes, but leaves an unpleasant taste. It is best to have several clean mouthpieces available during each lesson, or use disposal mouthpieces where possible. At the end of each lesson, disinfect the T-piece and the internal surfaces of the corrugated tubes connecting the T-piece to the spirometer. (Hang these up to drain first.) Ethanol is preferable for this as it will evaporate more readily from the tubing crevices.
4 Exercise and safety: Spirometers should not be used to investigate breathing during vigorous exercise: most resistance to breathing will be noticed when ventilation rate and amplitude are elevated, and exercising while attached to a spirometer can be stressful. Make sure that students are appropriately dressed (and wearing appropriate footwear) for any exercise undertaken as part of an investigation. Also, make sure that any apparatus used, for example, steps or blocks, are sturdy, well-built and anchored.
5 The spirometer: Do not use home-made spirometers. Supervise students using the spirometer closely at all times. Any investigations involving re-breathed air require particular vigilance on the part of the teacher. If any resistance to breathing is felt by the subject, end the investigation immediately.
With a spirometer filled with oxygen and carbon dioxide absorbed, the maximum time a student should use the spirometer is 5 minutes. Useful results can usually be obtained within 2-3 minutes. Without carbon dioxide accumulation, normal regulation of breathing does not occur and lack of oxygen will produce no visible signs of distress, until the participant becomes unconscious. There is no danger of the subject losing consciousness if more than half of the oxygen remains in the spirometer. For investigation of breathing after exercise, or breathing over an extended time, it is essential to use a spirometer filled with oxygen.
With a spirometer filled with air and carbon dioxide not absorbed, the maximum time a student should use the spirometer is 1 minute. Only a fifth of atmospheric air is oxygen and as the carbon dioxide level rises, the subject will experience a feeling of suffocation, feel short of breath and breathe faster and deeper. Brief the students that they may remove the mouthpiece and end the investigation themselves without being prompeted if they feel any distress! If the spirometer is filled with oxygen instead, there is no danger of lack of oxygen, but the subject will still show the symptoms of stimulated breathing.
With a spirometer filled with air and carbon dioxide absorbed, the maximum time a student should use the spirometer is 1 minute. As in the first case, the subject will feel no ill effects until unconsciousness sets in. There should be little danger if the experiment is run for under a minute, but the teacher should monitor the time and the subject closely – observing the student writing while using the spirometer enables a constant check to be made for impaired alertness at the onset of oxygen shortage.
6 Student health: Give careful consideration to the selection of subjects – it may be helpful to know medical histories. Participation in school sports teams is usually a good indication of fitness.
Ethical issues
Using a student as a subject for an investigation raises ethical issues. Any student involved should read the attached ![]() Acting as a subject for an investigation briefing and consent sheet (52 KB) and sign to say they are happy to take part.
Acting as a subject for an investigation briefing and consent sheet (52 KB) and sign to say they are happy to take part.
Procedure
SAFETY:
Take care handling Carbosorb/ soda lime.
Follow all safety directions for working with oxygen cylinders.
Check the spirometer has been set up correctly and ensure that readings are taken for only the time periods indicated in Note 5.
Ensure students using the spirometer are supervised at all times.
Disinfect the spirometer mouthpieces as directed (Note 3) and disinfect the spirometer at the end of the lesson.
Preparation - setting up the spirometer
a Fill the canister with a chemical for absorbing carbon dioxide, suchy as Carbosorb® or self-indicating soda-lime granules (Note 1).
b Check for leaks by filling the spirometer with air, closing all the taps and loading the lid of the chamber with a 200 g mass. If the chamber does not move during five minutes, there are no serious leaks.
c If using a kymograph, check that the pen writes on the drum throughout a complete revolution of the drum, and that the pen is towards the top of the recording chart paper with the chamber full of air/ oxygen. If using a motion sensor, make sure that the sensor and datalogging software are appropriately connected and you know how to collect the data.
d Calibrate the spirometer as follows:
i Empty all the air out of the chamber. If using a kymograph, make sure that the pen makes a mark on the lower part of the drum.
ii Let a specific volume of air into the spirometer chamber (say 500 cm3). Record the position of the chamber by making a mark on the kymograph.
iii Do this again, letting in the same volume of air each time, until the chamber has risen as high as possible.
e When you have finished calibrating, flush the spirometer with oxygen four times and leave it full, with the taps closed (Note 2).
Investigation – resting breathing rate and vital capacity
f The subject should be rested and sitting down, with a nose-clip in place. With the two-way tap closed and the mouthpiece connected to the outside atmosphere, insert the mouthpiece into the subject’s mouth and allow the subject to breathe steadily (normally) until they are accustomed to the apparatus.
g If you are using a kymograph, set the speed at 1 mm s–1.
h When ready to proceed, at the end of an outward breath, turn the two-way tap to connect the subject to the spirometer chamber. This must be done at the end of an outward breath so that the first movement of the spirometer lid will be downwards.
i After recording normal breathing for a minute or so, ask the subject to breathe in as deeply as possible, and then resume normal breathing.
j After a few more breaths, ask the subject to breathe out as far as possible, and then to resume normal breathing for a minute or so.
k Dispose of or clean the mouthpiece used by the subject (Note 3).
l Find the mass of the subject in kilograms.
Investigation – oxygen consumption
m Use a subject who has not eaten for at least two hours before the investigation, and who has been resting for 30 minutes – preferably lying down. With the two-way tap closed, and the mouthpiece connected to the outside atmosphere, put the nose-clip on the subject and the mouthpiece in their mouth, and allow them to breathe until they are accustomed to the apparatus.
n At the end of an outward breath, open the two-way tap and begin recording tidal breathing. Record for five minutes.
o Ask the subject to perform some vigorous exercise for about 5 minutes – walking up and down a flight of stairs or stepping on and off a low, stable bench (Note 4).
p While the subject is exercising, recharge the spirometer with oxygen and have the nose-clip and mouthpiece ready so they can record their breathing as soon as the exercise is over. Remember to start the record at the end of an outward breath.
Teaching notes
Interpreting the trace
The depth of breathing is determined by measuring the vertical movement of the pen (or motion sensor) from one peak to the next trough on the trace and comparing this with the initial volume calibration.

The rate of breathing (breaths per minute) may be determined with reference to the time scale. From a kymograph trace, you would need to know the speed of rotation of the drum (in mm s–1) to calculate the horizontal displacement equivalent to 10 or 60 seconds.
Our normal resting breathing moves only a small percentage of the air contained in our lungs. The lungs are highly elastic and can move significantly more air when we take exercise than we normally move at rest.
- The volume of air that a human breathes into and out of their lungs while at rest is called the tidal volume. This is a relatively small volume of air (around 500 cm3) and provides enough oxygen for a human’s resting needs.
- The maximum amount of air that may be inspired, above tidal inspiration, is called the inspiratory reserve volume. The typical adult value is 2 to 3.2 dm3.
- The maximum amount of air that can be breathed out, above tidal expiration is called the expiratory reserve volume. The typical adult value is 0.75 dm3 to 1 dm3.
- The vital capacity is the sum of all three of these volumes.
Tidal volume, inspiratory reserve volume and expiratory reserve volume can all be calculated from the trace made by the spirometer in the above procedure.

Even in dead mammals, the lungs are never completely empty of air. The air that we cannot expel from the lungs, even with the hardest effort of expiration, is called the residual volume. The typical adult value is around 1.2 dm3.
Estimate the total lung capacity by multiplying the expiratory reserve volume by six. Typical adult human value is around 5.5 to 6 dm3. Then calculate the residual volume by subtracting the vital capacity.
Under the slightly unusual circumstances of the investigation, the subject may be breathing abnormally. If the subject is breathing ‘high up’ or ‘low down’ in the lungs, calculated values of vital and total lung capacity may appear unnaturally large or small.
A normal inspiration brings the tidal volume of air into the lungs, where it mingles with the air already there. However, not all of the air in the tidal volume is available for gas exchange. Some of the tidal inspiration never reaches the alveoli, but remains in the trachea and other tubes in the system. The lining of most of the bronchial trees is unavailable for gas exchange, and is known as the ‘dead space’. The dead space of a subject’s lungs is roughly in proportion to their total body mass. A mass of 0.45 kg is roughly equivalent to 1 cm3 of dead space.
Therefore:

Using the spirometer to investigate cellular respiration and metabolic activity
The amount of oxygen consumed is found by comparing the lowest point of a trace at the start of a time period with the lowest point of the same trace at the end of this period. Compare this vertical distance with the initial volume calibration.
If a line drawn through all the peaks of a trace in any one period is straight, this shows that the subject consumed oxygen at a constant rate.

Oxygen consumption gives a measure of metabolic rate. Humans can release approximately 20.18kJ of available energy for every dm3 of oxygen consumed. The calculation for resting metabolic rate is:
resting metabolic rate (kJ h-1) = 20.18 x oxygen consumption per hour (dm3)
This is not the basal metabolic rate, as the subject is likely to have eaten in the last 12-18 hours and is still absorbing food from the gut, and is also sitting rather than lying down. The attached ![]() spreadsheet (15 KB) might make it easier to calculate the metabolic rate for the traces given on the
spreadsheet (15 KB) might make it easier to calculate the metabolic rate for the traces given on the ![]() student sheet (1.0 MB).
student sheet (1.0 MB).
If the exercise is anything more than very light, the subject will incur an oxygen debt, and therefore oxygen uptake during or immediately after exercise will not give an accurate picture of energy usage during exercise.
A subject who has just finished some vigorous exercise usually feels hot. The expired air may be at a higher temperature than previously which would affect the volume of the gas in the spirometer. Measure the temperature of the air in the spirometer on both occasions to make sure this is not the case. If it differs considerably, make a correction when calculating the volume of oxygen. (Use the formula derived from Boyle’s Law).
Health & Safety checked, May 2009
Downloads
Download the student sheet  Using a spirometer to investigate human lung function (1.0 MB) with questions and answers.
Download ![]() Acting as a subject for an investigation - Spirometer briefing and consent sheet (52 KB)
Acting as a subject for an investigation - Spirometer briefing and consent sheet (52 KB)
Download ![]() Spreadsheet for calculating metabolic rate (15 KB)
Spreadsheet for calculating metabolic rate (15 KB)
Related experiments
How do plants and animals change the environment around them?