How do plants and animals change the environment around them?
Class practical
In this experiment hydrogencarbonate indicator shows the concentration of carbon dioxide in the environment of aquatic animals and plants. Over a 24 hour period, explore which combinations of plants and animals make a stable ecosystem in light or dark conditions.
Lesson organisation
This activity involves handling aquatic plants and animals collected in advance from a suitable pond. Students may therefore have some contact with pond water which can carry infectious diseases, so take hygiene precautions.
If necessary, reduce the apparatus required (and the time involved) by students working in larger groups, with each group making up one set of experimental tubes.
The experiment needs to run for 12 hours, so set up one day to read the results the next. Switch the lesson focus to interpretation and evaluation of method rather than practical skills development if you are short of time.
The indicator used to show levels of carbon dioxide is hydrogencarbonate indicator and the investigation uses soda lime which should only be handled by qualified staff.
Apparatus and Chemicals
For each group of students:
Flat-bottomed specimen tubes (7 cm x 2.5 cm), 8 (or boiling tubes) (Note 3)
Bungs (to fit tubes), 8
Means of labelling tubes
Racks to support the tubes
Light source
Lightproof box or cupboard
Water plants, such as Elodea or filamentous alga, 8–10 lengths per working group (Notes 4 and 5)
Water animals such as water snails or Gammarus (Notes 4 and 5)
For the class – set up by technician/ teacher:
Hydrogencarbonate indicator solution (Recipe card 34) diluted 1 part in 10, equilibrated with atmospheric carbon dioxide, 100 cm3 per group (Note 1)
Samples of hydrogencarbonate indicator showing the range of colours produced by atmospheres at different concentrations of carbon dioxide (Note 2)
Health & Safety and Technical notes
To collect Elodea or filamentous alga and pond animals you will have to work with pond water. Take hygiene precautions to minimise risk of infections from pond water (Note 5).
Soda lime is corrosive. (Refer to CLEAPSS Hazcard 91.) It should be handled only by technician/ teacher wearing gloves and eye protection. Be aware of first aid response if any gets into the eyes.
1 The indicator used to show levels of carbon dioxide is hydrogencarbonate indicator. Refer to CLEAPSS Recipe card 34 for details. The risks of indicators are unknown, so it should be made up by qualified staff using eye protection and in a fume cupboard. The resulting solution is Low hazard. You must use freshly prepared indicator solution.
2 Set up three tubes to show the range of colours produced by this indicator with carbon dioxide.
Tube 1: breathe into this through tubing or a straw before inserting the stopper. Exhaled air contains increased levels of carbon dioxide.
Tube 2: equilibrate this with normal air before stoppering. A fish tank bubbler might be useful. This will show normal levels of carbon dioxide.
Tube 3: place a muslin bag of soda lime granules in this tube, held in place with the stopper. You will need to do this some hours in advance. Soda lime absorbs carbon dioxide, so this shows the effect of no carbon dioxide in the air. Soda lime is Corrosive – refer to CLEAPSS Hazcard 91 – and should only be handled by qualified staff. Be aware of the first aid and medical response required should soda lime get into the eyes.
3 Wash all glassware very carefully and rinse with 0.01 M potassium hydrogencarbonate before use, as traces of acidic or alkaline chemicals will affect the indicator.
4 Rinse the plants and animals with 0.01M potassium hydrogencarbonate to prevent a colour change due to acids on their leaves or exoskeletons.
5 Pond water could contain disease-causing microbes, so take hygiene precautions and ensure students cover cuts or abrasions with waterproof plasters or gloves. Students will need to wash their hands with appropriate cleansers before leaving the teaching room. Refer to CLEAPSS Supplementary Risk Assessment SRA 09 09/06 for more details.
6 At some times of the year (when background light levels are lower) plants are less active. At all times of the year, the continuous light you provide needs to be intense enough to promote photosynthesis. Fluorescent striplights or halogen lamps are recommended, even in the summer months.
Ethical issues
Take care not to damage natural environments when harvesting from a pond.
Put used plant material and aquatic animals into fresh pond water for a few hours before returning to the pond, and return only the living material. This will limit the amount of indicator that is introduced to the pond.
Procedure
SAFETY: Wear eye protection and gloves to make up indicator in a fume cupboard. (Refer to CLEAPSS Recipe card 34)
Wear eye protection and gloves to handle soda lime. (Refer to CLEAPSS Hazcard 91)
Take hygiene precautions when handling pond organisms and pond water. (Refer to CLEAPSS Supplementary Risk Assessment SRA 09 09/06 for more details.)
Preparation
a Collect plant material such as Elodea or filamentous alga and animal material such as water snails or Gammarus from a pond.
b Rinse with 0.01 M potassium hydrogencarbonate (Note 4).
c Cut the plant material into 5 cm lengths.
d Make up a fresh indicator solution (Note 1).
e Wash the tubes thoroughly and rinse with 0.01 M potassium hydrogencarbonate (Note 3).
f Set up three sample tubes to show range of indicator colours (Note 2).
Investigation
a Take eight flat-bottomed specimen tubes in a rack (or boiling tubes).
b Label the tubes A, B, C, D, E, F, G and H.
c Fill each tube to about 2 cm from the top with hydrogencarbonate indicator solution. This will detect changes in carbon dioxide concentration. Try not to breathe directly over the open tubes.
d Add only aquatic animals to tubes A and E, and only aquatic plants to tubes B and F. Add some aquatic plants and animals together in tubes C and G. Put only indicator solution in tubes D and H. The table below shows these combinations.
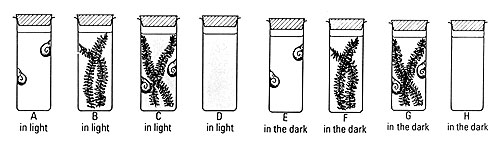
e Note the colour of the indicator in each tube.
f Put a bung in the top of each tube.
g Place tubes A, B, C and D in continuous light (Note 6). Place tubes E, F, G and H in the dark.
h Leave the tubes for the same length of time, which must be at least 12 hours.
i Compare the colours of the indicator in your tubes with the standard tubes.
j Note the colour of the indicator. Decide if the tube contains more or less carbon dioxide than before, or if the amount has stayed the same.
|
|
A |
B |
C |
D |
E |
F |
G |
H |
| Animals |
y |
n |
y |
n |
y |
n |
y |
n |
| Plants |
n |
y |
y |
n |
n |
y |
y |
n |
| Light or dark? |
light |
light |
light |
light |
dark |
dark |
dark |
dark |
| Starting colour of indicator |
|
|
|
|
|
|
|
|
| Final colour of indicator |
|
|
|
|
|
|
|
|
| Change in carbon dioxide |
|
more |
|
|
|
|
|
|
| Respiration? |
|
yes |
|
|
|
|
|
|
| Photosynthesis? |
|
yes |
|
|
|
|
|
|
Teaching notes
For this experiment, take plant material and small aquatic animals (invertebrates) from their natural environment and place them for up to 24 hours in an unnatural chemical solution before returning them. Most of the organisms will recover fully from this experience, but some may not. The impact on the pond for a small scale investigation is likely to be minimal. It provides an opportunity to discuss the ethical issues of potentially damaging living organisms to obtain scientific knowledge and of appropriate care for living organisms.
The effect of plants on carbon dioxide levels in an atmosphere is an essential part of understanding any proposed solutions to reducing atmospheric carbon dioxide (and possibly limiting global climate change). A close look at the formulae shows that the amounts of carbon dioxide taken in for photosynthesis and given out in respiration balance exactly – 6 molecules for every molecule of glucose.
This demonstration looks at changes over a 12-24 hour period. It may be worth exploring with very able students the net effect of plant growth during the timescale of a plant’s lifetime, and the time it takes to rot away. Plants cause a net reduction of carbon dioxide in their environment only during the time that their body mass is increasing or remains intact. Once a plant has decomposed fully, all the carbon dioxide taken in during photosynthesis is returned to the atmosphere.
The formula for photosynthesis is 6CO2 + 6H2O ? C6H12O6 + 6O2
The formula for respiration is C6H12O6 + 6O2 ? 6CO2 + 6H2O
In this practical, you should see clear changes to the hydrogencarbonate indicator with only plants in the light (carbon dioxide reduction) and with only animals in both light and dark conditions (carbon dioxide increase). In the mixed tubes, and with plants in the dark, the final result will depend on the relative amounts of plant and animal material. You need quite a bit of active animal body mass – equivalent to one 1 cm pond snail – to counterbalance the effect of 5 cm of Elodea.
Health and safety checked, September 2008
Downloads
Download the student sheet ![]() How do plants and animals change the environment around them (96 KB) with questions and answers.
How do plants and animals change the environment around them (96 KB) with questions and answers.
Related experiments
Investigating factors affecting the rate of photosynthesis
This practical shows how to explore the factors that affect the rates of photosynthesis in Elodea in more detail.
Investigating photosynthesis using immobilised algae
This procedure shows a different approach to photosynthetic investigations using alga trapped in alginate balls as the photosynthetic organism and again using hydrogencarbonate indicator and changes in carbon dioxide concentration to follow the reaction.
Web links
www.upd8.org.uk/activity/266/Global-Warming-Swindle.html
If you want to explore carbon dioxide and global climate change more, this link is to an activity that explores and evaluates different theories about climate change. You have to register to download activities, but there is no charge.
(Websites accessed October 2011)