Making a pour plate
Notes based on information in 'Basic practical microbiology' © Society for General Microbiology.
Refer to Aseptic techniques before starting this or any other microbiology practical work.
In a pour plate, a small amount of inoculum from a broth culture is added by pipette to the centre of a Petri dish. Cooled, but still molten, agar medium in a test tube or bottle is then poured into the Petri dish. The dish is then rotated gently, or moved back and forth (first N-S, then NW-SE, then NE-SW), to ensure that the culture and medium are thoroughly mixed and the medium covers the plate evenly.
Pour plates allow micro-organisms to grow both on the surface and within the medium. Most of the colonies grow within the medium and are small in size and may be confluent. The few colonies that grow on the surface are of the same size and appearance as those on a streak plate.
These plates could then be used to test the anti-microbial effects of various substances. For more information see Investigating antimicrobial action.
Otherwise, plates such as this could be part of the investigation of the population of bacteria in a sample. Culturing serial dilutions in this way permits a calculation of the population size of a bacterial sample. If the dilution and volume of inoculum, usually 1 cm3, are known, the viable count of the sample per cm3 can be determined. The viable count is the number of bacteria or clumps of bacteria per cm3. The dilutions chosen must produce between 30 and 100 separate countable colonies. (See also Standard technique: Making serial dilutions)
Health & Safety and Technical notes
1 Use a water bath at 50 °C to store bottles of molten agar.
2 Take care not to contaminate the molten agar in the bottles with water from the water bath. To avoid contamination ensure:
i that the water in the water bath is at the right depth
ii that the bottles are kept upright
iii that the outsides of the bottles are wiped before they are used.
3 In an evenly spread pour plate, the base of the plate must be covered, agar must not touch the lid of the plate and the surface must be smooth with no bubbles.
4 CLEAPSS Laboratory handbook section 15.2.12 suggests some alternative methods of making a pour plate, and considers their pros and cons.
Procedure
Inoculation using a Pasteur pipette
At all times, hold the pipette as still as possible.
a Loosen the cap/ cotton wool plug of the bottle containing the inoculum.
b Remove the sterile Pasteur pipette from its container, attach the teat and hold in your right hand.
c Lift the bottle/ test tube containing the inoculum with your left hand.
d Remove the cap/ cotton wool plug with the little finger of your right hand.
e Flame the bottle/ test tube neck.
f Squeeze the teat bulb of the pipette very slightly. Put the pipette into the bottle/ test tube and draw up the required volume of the culture. Do not squeeze the teat bulb of the pipette after it is in the broth as this could cause bubbles and possibly aerosols.
g Remove the pipette and flame the neck of the bottle/ test tube again. Replace the cap/ cotton wool plug.
h Place the bottle/ test tube on the bench or in its rack.
Inoculating the Petri dish
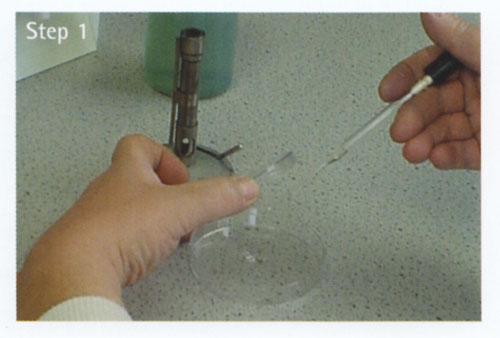
a Lift the lid of the Petri dish slightly with your right hand and insert the pipette into the Petri dish. Gently release the required volume of inoculum onto the centre of the dish. Replace the lid.
b Put the pipette into a discard pot.
Pouring the plate
a Collect a bottle of sterile molten agar from the water bath (note 1 and 2).
b Hold the bottle in your right hand. Remove the cap with the little finger of your left hand.
c Flame the neck of the bottle.
d Lift the lid of the Petri dish slightly with the left hand and pour the sterile molten agar into the Petri dish. Replace the lid.
e Flame the neck of the bottle and replace the cap.
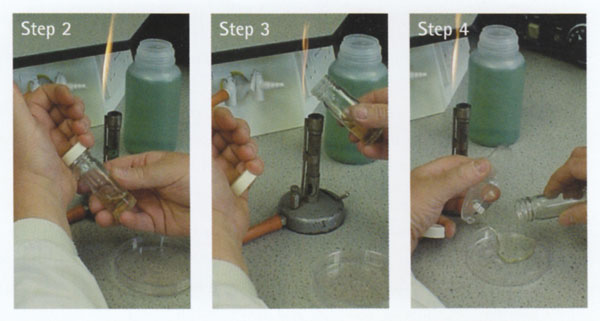

f Move the dish gently to mix the culture and the medium thoroughly and to ensure that the medium covers the plate evenly (note 3). Either move the dish in three directions: first N-S, then NW-SE, then NE-SW, or rotate it until the medium and inoculum are well-mixed and cover the base of the dish.
g Allow the plate to solidify.
h Tape the plate closed and incubate in an inverted position.
Web links
Microbiology teacher resources
Society for General Microbiology – source of Basic Practical Microbiology, an excellent manual of laboratory techniques and Practical Microbiology for Secondary Schools, a selection of tried and tested practicals using microorganisms.
Microbiology online
MiSAC (Microbiology in Schools Advisory Committee) is supported by the Society for General Microbiology (see above) and their websites include more safety information and a link to ask for advice by email.
(Websites accessed October 2011)
