Microbes all around us
Class practical
Microbes are found everywhere, but they are mostly far too small to be seen by the naked eye. This activity allows students to discover that microbes are found in a range of different habitats, to explore the variety of microorganisms around us and to compare the range of microorganisms that are found in different places. This activity also introduces skills for safe handling of microbial material.
 This practical is based on an investigation called
 ![]() Finding and growing microbes (286 KB) published in Practical Microbiology for Secondary Schools © Society for General Microbiology.
Finding and growing microbes (286 KB) published in Practical Microbiology for Secondary Schools © Society for General Microbiology.
Lesson organisation
Give each working group (2 students) one nutrient agar plate and one malt extract agar plate. Nutrient agar supports the growth of a wide range of bacteria and fungi from the soil and air. Malt extract agar supports better growth of fungi, because the low pH and nutrient content reduce the competition from bacteria. Students could discuss which habitat they would like to investigate, and how to make sure their results will be reliable. Students will also need to discuss how they can reliably compare their results with other groups working with samples from the same habitat, and also with groups working with samples from different habitats.
Provide pond water, and soil suspended in sterile water in sterile containers. Discuss how to transfer these to the agar plates without introducing contamination.
Discovering the range of microbes in the environment could lead to a discussion of how hard it is to keep samples, containers and other equipment uncontaminated when carrying out microbial investigations. This observation could link into How Science Works, with a discussion about why it is important to minimize or prevent microbial contamination in commercial, medical or forensic contexts.
Apparatus and Chemicals
Material per group investigating pond water
Sterilised bottle containing 10 cm3 pond water
Material per group investigating soil
Sterilised bottle containing 1 g of soil suspended in 100 cm3 of sterile watere
Apparatus and materials (each group)
Nutrient agar plate, 1 and malt extract agar plate, 1
VirKon solution 1% w/v (see manufacturer’s instructions)
Sterile dropping pipettes, 2
Sterile swabs, 2 (Note 1) or 2 sterile glass or plastic spreaders
Bunsen burner
Marker pen
Adhesive tape
Health & Safety and Technical notes
For detailed information on health and safety issues with regard to microbiology investigations in schools and colleges, refer to Basic Practical Microbiology – a Manual available free from the Society for General Microbiology (SGM); email This email address is being protected from spambots. You need JavaScript enabled to view it. or go to the safety area on the SGM website – http://www.microbiologyonline.org.uk/teachers/safety-information
Key safety points
- Do not collect microbes to culture from toilets.
- Do not culture from human body fluids or skin other than hands and fingers.
- Do not incubate plates above 25 °C.
- Invert agar plates before incubating
- Tape the lids and base of agar plates together with 2-4 short strips of adhesive tape.
- After incubation, seal plates before inspection.
- Take steps to kill cultures if there is a risk of the plates being opened (e.g. treatment with methanal – Note 2). Alternatively plates can be sealed in zip -lock bags before inspection.
- Count the plates out and in again if there is any chance of students taking them away. This is good practice if plates have not been methanal-treated to kill the microbes.
- Sterilise cultures after use, and dispose of according to guidance in Basic Practical Microbiology – a Manual (p 17).
1 Prepare moistened sterile swabs by sterilising cotton buds in Universal bottles with a little water (see CLEAPSS Laboratory Handbook 15.2).
2 Stop the growth of a culture completely by placing a piece of filter paper the size of the plate inside the lid of the inverted plate. Carefully add 40 % carefully to soak the filter paper, and replace the base. Leave for 24 hours. Remove the filter paper, remove any surplus liquid, and reseal the plate.
Ethical issues
There are no ethical issues with this procedure.
Procedure
A full risk assessment must be carried out before embarking on any practical microbiological investigation. See Basic Practical Microbiology – a Manual (page2).
Preparation
Basic Practical Microbiology – a Manual (BMP) has information on standard techniques relevant to this experiment.
a Refer to Standard techniques for details of handling agar and preparing your own agar plates, or buy ready-prepared plates (Basic Practical Microbiology (BMP) page 12 – see Suppliers below).
b Prepare a suitable solution to disinfect the work area both before the investigation and afterwards. Suitable disinfectants include sodium chlorate(I) (hypochlorite) at concentrations greater than 1% (refer to CLEAPSS Hazcard 89), or 1% VirKon used according to manufacturer’s instructions (BPM page 7).
c Sterilise pipettes if needed to inoculate plates with water or soil mixture (BPM p 7).
d Sterilise bottles for collecting samples (BPM p 7).
e Sterilise spreaders if needed (BPM p 7).
f Prepare sterile swabs if needed (Note 1).
g Prepare soil sample suspended in sterile water.
h Collect pond water sample.
Investigation
a Keep one nutrient agar plate and one malt extract plate unopened as controls.
b Divide students into 3 large groups according to the habitat they are investigating – air, pond water or soil. Within these groups students can work in pairs.
c Provide each pair with two agar plates – one nutrient agar and one malt extract agar.
d Students label each plate on the bottom with name, date and habitat.
e Students inoculate or expose their plates according to their chosen habitat. If students are using liquids – but not using sterile swabs or spreaders – allow time for the liquid to be absorbed into the agar before the dish is moved.
Exposure to air
Students chose a place to leave both their agar plates open to the air. They take the lids off each dish and keep them open until the end of the lesson.
Then they replace the lids.
Pond water
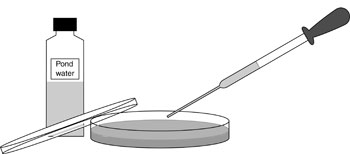
Students shake the bottle of pond water gently to mix the contents. They remove the top, flame the neck of the bottle in the Bunsen burner, and draw up a small amount of water with a sterile dropping pipette. The neck should be flamed again and the top replaced. Students lift the lid from the nutrient agar plate and dispense 2–3 drops on to the surface of the agar. They discard the pipette into the beaker of disinfectant. They then use a sterile glass spreader or swab to spread the drops evenly over the agar. They should discard the swab or spreader into the beaker of disinfectant.
They should follow the same procedure for the malt extract agar plate.
Soil suspended in sterile water
Students should follow the same procedure for pond water, using the bottle of soil suspension.


f Students tape the lids onto the plates before incubation to ensure they cannot be opened accidentally. Do this by fixing with 2 or 4 short strips of adhesive tape at opposite edges of the dish. Do not seal completely – this may promote the growth of anaerobic pathogens and/or prevent the growth of aerobic organisms.
g Invert plates and incubate at temperatures below 25 °C for 2-3 days. This reduces the risk of culturing microbes pathogenic in humans.
h Seal plates and place in zip-lock bags if required.
i Students observe, describe, and draw the colonies on the plate.
The following website may be useful as a starting point to help describe the colonies.
http://www.sciencebuddies.org/science-fair-projects/project_ideas/MicroBio_Interpreting_Plates.shtml
Teaching notes
Culturing microorganisms like this can be fascinating for students and teachers. If you or your technician are unsure about what safety precautions are necessary, seek advice from MiSAC / SGM or CLEAPSS who run regular courses on basic practical microbiology.
Exposure of the agar plates in a variety of places should, after incubation, produce growth of bacteria and fungi. The number of colonies may be a reflection of the disturbance of the air by convection currents or people. Microbes in disturbed air may not be detected, as they are held in suspension. Soil and water will probably yield more microbial colonies than air.
It’s worth making sure students understand that each colony on the final plate is a collection of thousands or millions of microorganisms. The individual organisms are microscopic and mostly too small to see with the naked eye which is why we have to grow colonies on a plate like this. The agar contains suitable nutrients for growth.
You could develop self-assessment or peer-assessment of these investigations, and use it as a starting point for planning more complex investigations.
Health and safety checked, September 2008
Downloads
Download the student sheet ![]() Microbes all around us (61 KB) with questions and answers.
Microbes all around us (61 KB) with questions and answers.
Download the original protocol from SGM ![]() Finding and growing microbes (286 KB).
Finding and growing microbes (286 KB).
Web links
Society for General Microbiology – Basic Practical Microbiology – A Manual, an excellent manual of laboratory techniques and Practical Microbiology for Secondary Schools, a selection of tried and tested practicals using microorganisms.
www.microbiologyonline.org.uk
email This email address is being protected from spambots. You need JavaScript enabled to view it.
(Websites accessed October 2011)


