Investigating the effect of minerals on plant growth
Class practical
All of these techniques involve a long-term project – prepared in one lesson, left for about a month (see Note 2), then with results gathered in one or more lessons after that time. There is scope for focus on the scientific methods involved in planning, controlling variables, collecting and analysing data, as well as on the biology of plant nutrient requirements. The methods include several different dependent variables – percentage cover, harvested mass, dry mass, turbidity, population count with haemocytometer. Each method produces a qualitative outcome as well.
Lesson organisation
In the first lesson, present the biological problem – how to investigate the effects of different minerals on plant growth. Give each group of students a different option for following plant growth. Ask each group to plan in detail how they would set up an investigation. Evaluate the methods in terms of controlled variables, reliability, and ease of data collection. Decide which method to work with. If you can manage the practicalities of two different investigations, choose two.
In the next lesson, set up an investigation (or two). Get all students involved – for example, if using the radish method, each student could set up one pot of seeds, for a particular culture medium, all seeds could be grown together and results pooled.
In the final lesson, collect the results and collate for the group – showing how to calculate means and discussing reliability of results and validity of any conclusions drawn.
Apparatus and Chemicals
 For the class – set up by technician/ teacher:
Mineral nutrient mixes (Note 1)
For each group of students:
Plant material to investigate and associated materials. Choose from A, B, C or D.
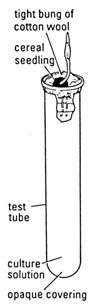
A Germinating barley
Healthy barley seedlings, approximately 6, germinated a week in advance (Note 3)
test tubes (1 per culture solution)
cotton wool
aluminium foil or black card/ polythene to surround test tubes
dropping pipette
B Radish
Seeds – 2 per container
Growing medium – peat/ vermiculite mix (Note 4)
Small container (for example a film canister) with hole cut in bottom, 1 per set of seeds
Wicks – a piece of capillary matting/ cloth cut into narrow diamond shape, 1 per container
Capillary matting and water reservoirs – one per culture medium (Note 5)
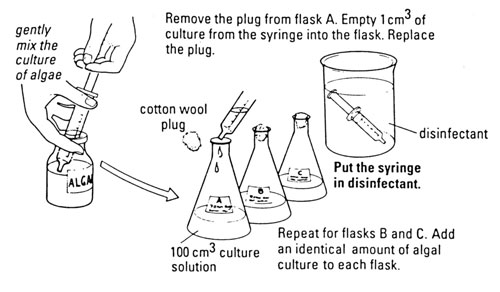
C Algal culture
Algal suspension – in full mineral salts medium (Note 6)
Conical flask, 1 per culture solution
Cotton wool
Syringe to dispense 1 cm3 of algal suspension
Disinfectant for syringe
Measuring cylinder, 100 cm3
Microscope
Microscope slide
Cover slip
D Lemna (duckweed)

Healthy Lemna plants of similar size, 10 per culture solution
Beakers or jam jars, 1 per culture solution
Plastic film to cover the beakers or jars
Health & Safety and Tehnical notes
1 Solid media to prepare Long Ashton water culture, or Sach’s water culture solutions, are available from Timstar or Philip Harris (see Suppliers). It can be cheaper, and is certainly much easier, to buy the ready-prepared nutrient solutions if not all the chemicals are available in-house. But you could make up your own solutions using the recipe from the CLEAPSS Recipe card.
Sach’s culture solution (complete recipe): Dissolve the following salts in 1 litre of distilled water.
- 0.25 g of calcium sulfate(VI)-2-water
- 0.25 g of calcium phosphate(V)-2-water CaH4(PO4)2.2H2O
- 0.25 g of magnesium sulfate(VI)-7-water
- 0.08 g of sodium chloride
- 0.70 g of potassium nitrate(V) (see CLEAPSS Hazcard – OXIDISING and DANGEROUS with some metals and flammable substances)
- 0.005 g of iron(III) chloride-6-water (see CLEAPSS Hazcard – HARMFUL as a solid)
For Sach’s culture solution with mineral deficiencies, make the following changes.
- Deficient in calcium: 0.2 g of potassium sulfate(VI) replaces calcium sulfate(VI)-2-water and 0.71 g of sodium dihydrogenphosphate(V)-2-water replaces calcium phosphate(V).
- Deficient in iron: Omit iron(III) chloride-6-water.
- Deficient in nitrogen: 0.52 g of potassium chloride replaces potassium nitrate(V).
- Deficient in phosphorus: 0.16 g of calcium nitrate(V)-4-water (see CLEAPSS Hazcard – OXIDISING and IRRITANT) replaces calcium phosphate(V).
- Deficient in sulphur: 0.16 g of calcium chloride (see CLEAPSS Hazcard – IRRITANT as solid) replaces calcium sulfate(VI) and 0.21 g of magnesium chloride-6-water replaces magnesium sulfate(VI).
- Deficient in magnesium: 0.17 g of potassium sulfate(VI) (Hazcard 98B – low hazard) replaces magnesium sulfate(VI).
- Deficient in potassium: 0.59 g of sodium nitrate(V) (Hazcard 82 – oxidising and harmful as solid and dangerous with some metals and flammable materials) replaces potassium nitrate(V).
2 Each system requires a different lead-in time, a different length of time for results to develop and a different method for measuring the effects.
| Plants used | Lead-in time | Development time | Collecting results |
| A Germinating barley |
Moisten seeds to germinate about a week before use – in a layer of damp vermiculite in a margarine tub (or on wet OASIS). (Note 3) |
Results can be collected in about 3 weeks |
Observe the growth. Measure the mass of the seedling. Dry in a low oven (80-90 °C) until dry mass is constant. |
| B Radish – from seed |
No preparation of seeds required |
18-21 days if grown under a light bank for 24-hour light. Longer if illuminated normally. (Note 5.) |
Observe the growth. Measure the mass of radish, and then dry in a low oven (at 80-90 °C) until dry mass is constant. |
| C Algal culture, e.g. Scenedesmus quadricauda |
Culture about a litre of algal suspension for about 4 weeks in advance (Note 6.) |
Results can be collected at any time from 1 to 4 weeks – or over a longer investigation period. |
Compare turbidity by eye. Measure turbidity with a colorimeter, or estimate population of alga using a microscope and haemocytometer. |
| D Duckweed (Lemna) |
Collect healthy plants from a pond. Only possible at a time of the year when duckweed is available! |
4-8 weeks to achieve distinct results. |
Make notes of any differences in colour or other qualities of growth – such as root length. Estimate area covered on surface of water in container. |
3 If you germinate barley seeds on cotton wool or blotting paper, the roots may stick in the damp medium. Using OASIS or vermiculite avoids this – although it costs a little more. Refresh the mineral solution every couple of days by tipping out and replacing. Aerating the solution before applying to the roots may improve the general uptake of solution, and reduce the risk of the barley seedlings rotting.
4 The peat/ vermiculite mix must be low in nutrients – for example a seed compost, rather than multipurpose (which has added nutrients).
5 Water reservoirs and wicks: Set up a series of ice-cream containers containing each culture medium to be tested. Cut slots in the lids of the containers. Cut pieces of capillary matting as shown in diagram. Insert the capillary matting and pour enough culture medium into the ice-cream container to ensure that the matting remains moist at all times.

Place the wicks in the bottom of the small containers before filling (to within 5 mm of the top) with growing medium. Add 2 seeds to each container. Add 2-3 mm more growing medium and firm gently. Place the container on the capillary matting so that the wick can draw liquid mineral salts medium from the container.
6 Inoculate 500 cm3 of complete medium with Scenedesmus quadricaudus or Micrasterias thomasiana var. notata or Chlorella – about one week before required. Aerate continuously using a filter pump, or aquarium airstone and pump and keep in a light place or illuminate 24 hours a day. Sciento and Blades Biological provide suitable algae to culture. Do not use algae cultured on agar slopes.
Procedure
SAFETY: Follow good hygiene practice after handling pond water or plants removed from ponds.
Preparation:
If using barley seedlings, germinate about one week before use.
If using algal suspension, start culturing alga about 4 weeks before use.
Method A and B:
a Set up the plants (barley in liquid culture solution, or radish watered with culture solution) and allow to grow for about 3 weeks (for radish with 24 hour illumination or for barley).
b After 3 weeks, make qualitative observations of plant growth in each medium.
c Collect sample plant material, remove any adhering growth medium (radish) or blot off any liquid (barley). Measure the mass of the living material.
d Place the material in an oven at 80 – 90 °C to dry. Measure the mass every day until 3 readings are constant.
e Record the dry mass of plant material in each culture medium.
Method C:
f Observe the algal suspension by eye and make qualitative observations of which has grown best.
g Measure the turbidity of each sample using a colorimeter.
h Estimate the population of algae using a microscope and a small grid square, or a haemocytometer.
Method D:
i Make qualitative observations of the growth of each sample.
j Estimate the area of cover in each beaker/ jar by placing a grid underneath and counting the number of squares covered.
Teaching notes
In summary, any mineral deficiency will result in poor plant growth. It may be difficult for inexperienced botanists/ horticulturists to appreciate the subtle differences between one kind of poor growth and the next. Overall productivity is a simple measure of growth. You could also measure the total height (or length) of a plant leaf or stem (radish/ barley), and note the colour, and the pattern of loss of colour. Several deficiencies result in death of leaf tissue – so you may also notice different patterns of damage to the leaves. It is worth identifying veins and leaf margins and noting any changes in those areas.
Calcium deficiency shows in soft, dead, necrotic tissue at rapidly growing areas – such as on fruits, the tips of leaves and the heart of crops such as celery. If the margins of the leaves grow more slowly, the leaf tends to cup downwards. Calcium deficiency also leaves plants with a greater tendency to wilt than non-stressed plants.
Iron deficiency shows in strong chlorosis at the base of leaves – leading to completely bleached leaves. Bleached areas may develop necrotic spots.
Nitrogen deficiency results in generally poor growth – short, spindly plants – and general chlorosis (lack of chlorophyll). Plants show more tendency to wilt under water stress and to die more quickly. Young leaves at the growing point may still be green but will be small. Other leaves may lack colour entirely. In some plants, the underside of the leaves, and petioles and midribs may develop a purple colour.
Phosphorus deficiency produces dwarfed or stunted plants – perhaps with some necrotic spots on the leaves. They grow more slowly than similar plants not lacking phosphorus.
Sulfur deficiency shows in an overall chlorosis with veins and petioles gaining a reddish colouration. This includes young leaves. Leaves may be twisted and brittle.
Magnesium is an essential part of the chlorophyll molecule. Plants deficient in magnesium frequently show interveinal chlorosis (a lack of chlorophyll).
Potassium deficiency shows first in marginal chlorosis (loss of colour at the tips of the leaves). As this progresses, the leaves may curl and crinkle. Potassium is required for formation of healthy flowers and fruit– beyond the timescale of this investigation.
Downloads
Download the student sheet  Investigating the effect of minerals on plant growth (65 KB) with questions and answers.
Related experiments
Identifying the conditions needed for photosynthesis
Web links
www.saps.org.uk/primary/teaching-resources/216-adding-mineral-salt-do-radishes-grow-better
A link to the SAPS teacher notes on a related practical – investigating the effect of different amounts of mineral fertiliser on plant growth using the ‘radish in canister’ method.
(Website accessed October 2011)