
Measuring the rate of metabolism
This investigation involves handling whole living organisms and provides a quantitative method of exploring metabolism. Measurements of gas exchange, particularly the rate of uptake of oxygen, give a clear indication of the activity of respiratory metabolism. The equipment used is called a respirometer – not to be confused with a spirometer.
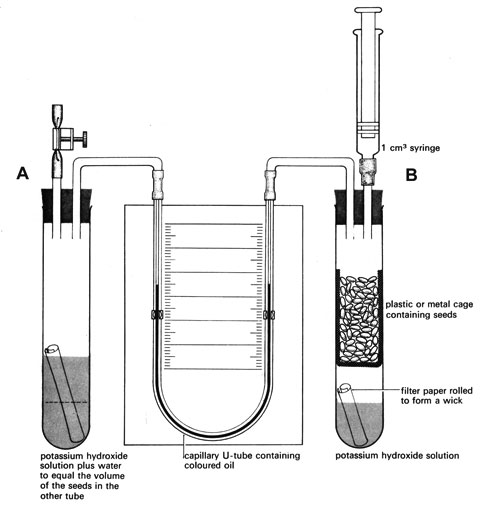
You can use respirometers to measure the uptake of oxygen by respiring mung beans or other small amounts of living material. This is done by measuring the change in the volume of gas surrounding the material and so it is essential to eliminate volume changes that could be caused by anything other than the uptake of oxygen.
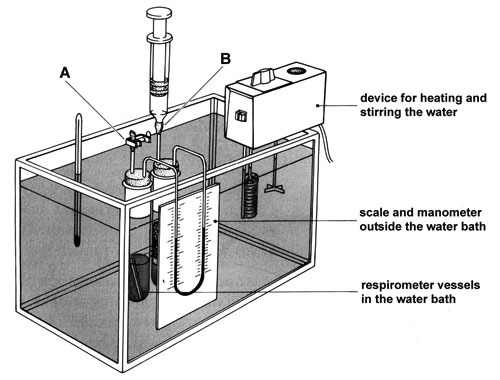
As the living material respires it will produce carbon dioxide. A solution of potassium hydroxide will absorb this gas. The apparatus consists of two vessels (see diagram in Note 1 below). One vessel contains the organisms and the other acts as a thermobarometer – small changes in temperature or pressure cause air in this vessel to expand or contract, compensating for similar changes in the first vessel. Changes in the manometer level are thus due only to the activities of the respiring material.
Lesson organisation
This will depend on how many factors you wish to investigate and how many water baths are available. Several groups could work with plant or animal material at normal laboratory temperature. If you have, for example, two water baths available, you could set them at +10 °C and +20 °C compared to the laboratory, and two groups could work with each water bath – each observing the effect of increased temperature on different living material (Note 2). The respirometers are relatively small and fiddly to handle, so it is better if students work in pairs rather than threes. If time is limited, provide students with pre-assembled respirometers.
Apparatus and Chemicals
For each group of students:
Respirometer, 1 (Note 1)
This is comprised of: two boiling tubes, one basket or cage (metal or plastic), one 1 cm3 syringe, two bungs (1-holed if using 3-way taps, 2-holed if these are not available), one manometer (a capillary U-tube fixed to a scale on a board and filled with coloured fluid – Note 2)
Potassium hydroxide solution, 15% (= 2.7 M), about 15 cm3, Note 3
Funnel
Filter paper, cut into strips to make tight rolls
Small quantity (about 5 cm3) of living material such as seeds (germinating), woodlice, Calliphora larvae or a locust
Health & Safety and Technical notes
Take care with potassium hydroxide solution or any other carbon dioxide-absorbing materials.
1 Respirometer: CLEAPSS Laboratory Handbook section 15.10 includes details of how to construct your own respirometers if you do not wish to purchase ready-made kit. Silicone rubber tubing is recommended, or aquarium pump tubing to connect to a 1 cm3 syringe. Short, narrow bits of tubing minimize wild movements of the manometer fluid caused by handling the apparatus. Rubber bungs are essential (not cork) as it is absolutely necessary that all joints are airtight. It might prove difficult to attach existing manometers and syringes to 3-way taps, in which case the 2-holed bung arrangement would be easier to set up.
When assembling a respirometer, push the connections together firmly but gently to achieve an airtight joint with low risk of breaking any glass tubing.
Make the respirometer airtight only after introducing the living material.
To check that the apparatus is airtight, move the marker fluid in the manometer to one end with the syringe and leave for a few minutes. The fluid should not move.
Support both vessels in a water bath (with the manometer outside the bath) if you wish to measure the effect on respiration of changing the temperature.
2 CLEAPSS Recipe card 13A describes several ways of making a suitable manometric fluid. Water strongly adheres to glass so an emulsifier is needed to prevent water droplets 'sticking' to the walls of the manometer and so affecting the readings, and to reduce capillary action in small-bore manometers. The simplest version is water containing a food dye such as cochineal with a few drops of detergent.
3 Potassium hydroxide: Use 15 g per 100 cm3 of water – a 2.7 M solution. Hazcard 91 describes this concentration as corrosive. Wear goggles when handling. If any of the solution gets into the eyes, flood the eye with gently-running tap water until a first-aider arrives. Send the affected person to hospital and ensure that irrigation is continued during the journey.
It can be very difficult to remove the living material from the tube without contaminating it (and so damaging it) with the hydroxide solution. As an alternative, you could attach a thread to a muslin bag of soda lime and drop that into the bottom of the tube. Soda lime is also corrosive – refer to CLEAPSS Hazcard 91. Wear eye protection and follow the first aid response above should any soda lime get into the eyes.
Ethical issues
There are no ethical issues if using plant material for this investigation. If using invertebrates (such as woodlice, Calliphora larvae or locusts) it is important to handle the organisms with care and respect, particularly ensuring that they do not come into contact with the potassium hydroxide solution. Teachers should be careful to introduce animals used like this in a way that promotes a good ethical attitude towards them and not a simply instrumental one. Although they are simple organisms that may not 'suffer' in the same way as higher animals, they still deserve respect. Return the animals promptly to their holding tank or natural environment after the investigation. This supports ethical approaches that are appropriate to all field work where animals are returned to their habitat after observations have been made.
Procedure
SAFETY:
Take care with potassium hydroxide which is corrosive. Wear goggles and wash any splashes off the skin immediately.
Assemble the apparatus by pushing the tubes together firmly but gently. If you force sections of apparatus together, you risk breaking glass components and cutting yourself.
Preparation
a Use a funnel to pour 5 cm3 of potassium hydroxide solution (Note 3) into each respirometer vessel. Make sure none of the potassium hydroxide touches the sides of the vessels.
b Add small rolls of filter paper to act as wicks.
c Fill the basket or cage with respiring material and put it into a vessel B. Make sure that the seeds or invertebrates are not touching the potassium hydroxide or the wick. Add water to vessel A to match the volume of respiring material in vessel B (see diagram).
d Fit vessel A with a bung holding two connecting tubes – one with a screwclip on flexible tubing. Alternatively, fit a bung with a 3-way tap connected to the same items.
e Fit vessel B with a bung holding a 1 cm3 syringe and a connecting tube as shown in the diagram. Alternatively, fit a bung with a 3-way tap connected to the syringe and tube.
f Draw a suitable manometric fluid (Note 3) into the manometer U-tube. The fluid must be free of bubbles and come to about the middle of the scale on each side.
g Open the screw clip and remove the syringe, then connect the manometer U-tube. Check the apparatus is airtight (Note 1).
h If using a water bath, put the apparatus in the water now and leave to equilibrate for 5 minutes.
i Set the piston of the syringe at about the 0.5 cm3 mark and insert the syringe as shown. Close the screw clip. Use the syringe to adjust the manometer so that the fluid levels are the same on both sides.
j Record the exact position of the syringe piston, the position of the menisci on both sides of the manometer, and the time.
Investigation
k Record new positions of the manometer fluid at four-minute intervals. When it nears the end of the scale on one side, restore it to its original position and note the new position of the syringe piston.
l Plot a graph of meniscus level against time.
m Continue to take readings until four consecutive readings lie on the same straight line.
n Raise the temperature of the water bath by 10 °C and repeat steps i to m.
o Remove and weigh the seeds or invertebrates.
Teaching notes
Students will benefit from the exercise of assembling their own respirometer, but it can take a long time to complete this successfully.
The practical depends on understanding that gas changes, especially the uptake of oxygen, act as indicators of the biochemical activity of organisms and their tissues. Using manometers to make quantitative measurements of gas changes is a historically important technique in metabolic research.
Rates of oxygen absorption depend not only on the temperature but also on the state of development of the organisms.
The attached Excel spreadsheet ![]() Calculating rate of metabolism (15 KB) will convert readings in cm3 over a number of minutes into mm3 per hour.
Calculating rate of metabolism (15 KB) will convert readings in cm3 over a number of minutes into mm3 per hour.
The higher the temperature, the greater the oxygen uptake (to a maximum, at which point enzyme damage by denaturation begins). Up to about 40 °C, expect a Q10 of 2. Between 40 °C and 50 °C, for seeds, the Q10 is likely to be in the range 0.6-1.0.
Calculate Q10 like this:
![]()
Downloads
Download the student sheet ![]() Measuring the rate of metabolism (136 KB) with questions and answers.
Measuring the rate of metabolism (136 KB) with questions and answers.
Download the spreadsheet ![]() Calculating rate of metabolism (15 KB).
Calculating rate of metabolism (15 KB).
Related experiments
Measuring respiratory quotient
This equipment (the respirometer) is used again to measure respiratory quotient – which gives an insight into the likely substrate used by an organism for respiration. Studying the stoichiometry of respiration of different substrates also introduces the idea of ‘metabolic water’ – a significant factor in maintaining hydration for desert-dwelling animals.