A closer look at blood
Class practical
These procedures involve taking samples of students’ blood for study. Check if your employer has made it a requirement to obtain parental permission (Note 1). Two investigations follow – staining blood to see the variety of cells in a sample, and investigating the osmotic balance of red blood cells by treating the sample with concentrated sodium chloride solution or distilled water.
Lesson organisation
Prepare an alternative activity in case students do not wish to take part (Note 2).
Two sets of observations are collected here – both using drops of blood from the students. If you can carry out both in the same session, it is easier to manage dealing with contaminated lancets and slides.
Any work with blood is safer if students are handling only their own blood.
If students work in pairs, one could make and stain their own blood smear (Investigation 1),
and the other could make up four slides to view the effect of different liquids on blood cells (Investigation 2).
Apparatus and Chemicals
For each group of students:
Investigation 1
Microscope slide, 1
Coverslip, 1
Ethanol, in dropper bottles (Note 11)
Leishman’s stain, in dropper bottles
Buffered saline, in dropper bottles
Investigation 2
Microscope slide, 4
Coverslip, 4
Detergent, in dropper bottle
Distilled water, in dropper bottle
For the class – set up by technician/ teacher:
For both investigations:
Lancets (Notes 3 and 5-6)
Sharps disposal box (Note 7)
Disposal pots of sodium chlorate(I) (see Preparation part b)
For Investigation 1
Leishman’s stain (Note 9)
Buffered distilled water (Note 10)
For Investigation 2
Sodium chloride solution, saturated, in dropper bottles
Sodium chloride solution, 0.8 per cent, in dropper bottles
Health & Safety and Technical notes
It is your employer’s responsibility to instruct you about any forbidden procedures. If you have not been made aware of any restrictions, it is reasonable to assume that there are none.
Carry out a full risk assessment before taking finger prick samples of blood and ensure appropriate procedures are in place for safe disposal of contaminated items (Notes 7 and 8 and Preparation).
Take care when handling Leishman’s stain as it is prepared with methanol (Note 9).
Read our standard health & safety guidance
1 CLEAPSS provide a customisable form letter to obtain parental permission (which is not a legal requirement unless so specified by an employer). Available from the CLEAPSS CD-ROM – document DLH14-4.doc.
2 Students must not be under any pressure to provide a blood sample. Teachers should make it clear by their attitude that it is normal not to want to provide a sample or take part in this work, and create an atmosphere in which students can decide to opt in later, or opt out – without having to give reasons. Any student or staff member who knows they are HIV positive or have tested positive for hepatitis B and/ or hepatitis C viruses should not give a sample. Students should be able to opt out without loss of confidentiality – but you need to make it clear that they should not take part if they believe they pose a risk to others.
3 Teachers should supervise the use of lancets closely, but students should take their own blood samples. This means there is no possibility of a later accusation of assault against a teacher. (If the teacher must take the sample, students should sign a consent form to give permission first – Note 1.) Students will find it much easier to obtain samples safely and with little stress if you use an automatic finger-pricking device, such as those used by diabetics to sample their blood regularly.
4 Students and teachers should wash their hands thoroughly (paying particular attention to the site chosen for sampling) using soap and water – using disposable towels or other hygienic means to dry them. Wipe the chosen puncture site with 70% alcohol (ethanol or isopropanol) and allow it to dry.
5 The teacher should assemble the instrument with a new, sterile, disposable lancet and detach the cap over the lancet tip. Pass it carefully to the student, making sure the lancet tip does not touch anything. The student then triggers the lancet and hands the device back to the teacher who disposes of the used lancet safely (Note 7).

6 Take blood with a sterile lancet from the side of a crooked finger, 5-10 mm from the lower corner of the nail, (see diagram below) using a new lancet for each person.
The skin of the finger tip is thicker and a puncture wound there poses a greater risk of later infection.
Making sure the hand is warm and encouraging blood flow to the hand by shaking it may improve the chances of obtaining a good sample.
7 Dispose of the lancets into a sharps container – preferably one provided by a school science supplier rather than a d-i-y box. Dispose of the sharps box via the normal route for disposal of clinical waste from your first-aid room.
8 Clear up spills of blood at once with a cloth soaked in freshly-prepared sodium chlorate(I) (hypochlorite) containing 10 000 ppm available chlorine.
9 Leishman’s stain – see Recipe card 12. Buy the solid stain and dissolve 0.15 g in 100 cm3 of methanol (see Hazcard 40B). Prepare in a fume cupboard, wearing suitable eye protection. Label the solution ‘toxic’ and ‘highly flammable’ (this is due to the presence of methanol). Use after 24 hours.
10 To prepare 100 ml of buffered water, mix 56 ml potassium dihydrogen phosphate solution (9.078 g per litre) with 44 ml of a solution of disodium hydrogen phosphate.12 water (11.876 g per litre).
11 Ethanol – refer to Hazcard 040A – use 70% v/v ethanol or propan-2-ol (isopropanol) which is highly flammable.
Ethical issues
Students must not be pressured into giving a blood sample, and must be able to withdraw without revealing any personal information about exposure to communicable diseases or any other medical conditions.
Procedure
SAFETY:
Ensure good hygiene before collecting blood and when handling any equipment contaminated with blood. There is a risk of contamination through broken skin, therefore any student with an open wound (particularly on the face or hands) needs to take particular care and may need to be excluded from participating.
Collect all lancets contaminated with blood in a sharps container and dispose of with clinical waste from the first-aid room.
Collect all other equipment (microscope slides etc) contaminated with blood by placing directly into a discard jar of disinfectant diluted to produce a solution containing 25 000 ppm available chlorine. Or collect contaminated glass in a suitable container (for example, a beaker) for subsequent autoclaving.
Preparation
a Sterilise slides or any other glassware that might come into contact with the site from which a blood sample is taken using an autoclave or oven; see CLEAPSS Laboratory Handbook section 15.12.2 (Heat sterilisation).
b Prepare a fresh supply of a suitable disinfectant, able to kill viruses. VirKon can be used provided the final solution has a concentration of at least 1%. Alternatively use a solution of sodium chlorate(I) (sodium hypochlorite) containing 10 000 ppm available chlorine (IRRITANT). This can be obtained by preparing a 10% dilution of a laboratory solution of sodium chlorate(I) containing not less than 10% (100 000 ppm) available chlorine (CORROSIVE). Note that domestic hypochlorite (bleach) solutions have already been diluted, often by an unspecified amount. It is difficult to make up accurate dilutions using such sources of the chemical.
c Make up discard pots of disinfectant as above but containing 25 000 ppm available chlorine.
d Set out an autoclavable disposal bag to collect any dressings or non-sharp items contaminated with blood.
e Make up the Leishman’s stain (Note 11). Take care when handling because of presence of methanol – toxic and flammable (Hazcard 40B).
Investigation 1 Making and observing a blood smear
f Clean your finger by washing your hands then wiping with an ethanol swab. Then use a sterile lancet to collect a drop of blood from your finger (Notes 4 to 7).
g Allow a drop of blood to fall onto a sterile slide and then wash the small wound under a tap, swab your finger with ethanol again and apply a sterile gauze dressing to the puncture site, pressing gently until blood flow stops. Place this dressing into an autoclavable disposal bag.
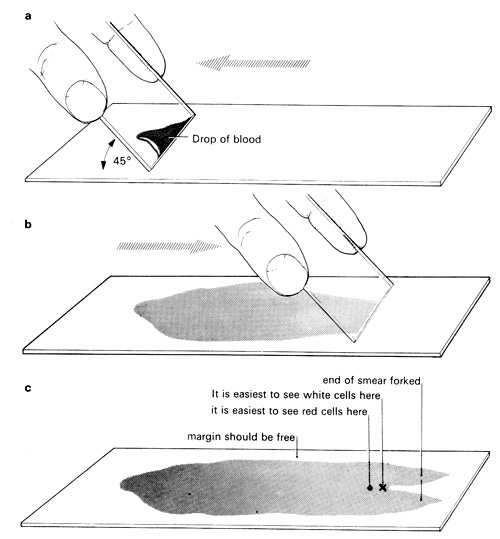
h Hold a second slide at an angle of about 45° and move it back so that it touches the drop as shown in diagram a, causing a thin film of blood to run along its base. Push the angled slide away from the blood so that the drop is pulled behind it and spread in a thin film over the surface of the lower slide (diagram b). The smear should extend, with a forked end, almost from one end of the slide to the other (diagram c). Leave the smear to dry.
i Dispose of the slide used to smear the blood by placing it in the discard pot.
j Pour ethanol onto the dry smear and leave for about 2 minutes before pouring it off. This fixes the blood cells.
k Place 5 drops of Leishman’s stain on the blood smear and leave for 1 minute. Add 5 drops of distilled water buffered to pH 6.6-6.8 and leave for 5 minutes. Wash the slide in 50 ml buffered distilled water to which a few drops of Leishman’s stain have been added until the film becomes a rosy-pink colour. Press lightly with filter paper to remove the water and wave in the air to dry. Place a coverslip over the forked end of the smear.
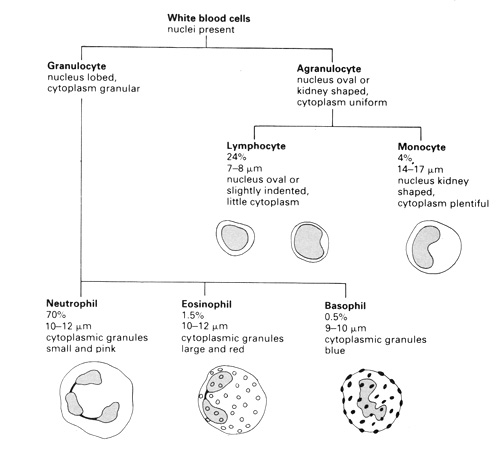
l Examine the slide under low and high power. Leishman’s stain shows up blood cells as follows:
- red blood cells – red to yellowish red
- neutrophils – dark purple nuclei, pale pink cytoplasm, reddish-lilac small granules
- eosinophils – blue nuclei, pale pink cytoplasm, red to orange-red large granules
- basophils – purple to dark blue nucleus, dark purple to black large granules
- lymphocytes – dark purple to deep bluish-purple nuclei, sky blue cytoplasm
- platelets – violet to purple granules
m Identify the kinds of white cell that are visible, using this key.
n Use an eyepiece graticule (on a calibrated microscope) to measure the size of the red cells.
o At the end of the practical, having disposed of all materials contaminated with blood, wash your hands again using soap and water and dry using disposable towels or other hygienic means.
Investigation 2 Investigating the osmotic balance of red blood cells
p Wash your hands carefully then wipe your finger with an ethanol swab. Use a sterile lancet to pierce your finger (Notes 3-7).
q Let one drop of blood fall into the centre of each of four clean slides. Cover each with a coverslip immediately.
r On each slide put a drop of a different liquid – distilled water, detergent, dilute sodium chloride solution or saturated sodium chloride solution – at one side of the coverslip. Draw the drop of liquid under the coverslip by placing a piece of filter paper at the opposite edge.
s When some mixing has occurred, examine a region of unaffected blood and a region of the blood/ liquid mixture.

t Observe each slide in turn under high power. Note the variety of shapes of cells as soon as the preparations have been made, and again after 10-15 minutes. Measure the sizes of the cells using an eyepiece graticule (on a calibrated microscope).
Teaching notes
Blood is a tissue – a collection of cells specialised to perform particular functions in the body. Unlike most tissues, blood is a fluid and its cells are suspended in a liquid medium called plasma.
Each investigation studies an aspect of the structure and function of blood.
Investigation 1 shows that blood is a complex mixture. After identifying each kind of blood cell on the smear, there is scope to explain the different functions of each kind. You can group white blood cells as one ‘type’ with the job of ‘defence’ if the detail is not appropriate to your exam specification or your group.
Investigation 2 shows that blood cells are affected by changing concentrations of dissolved solutes in the surrounding liquid medium. This highlights the body’s need for a system that monitors and responds to changes in the concentration of dissolved salts in plasma.
Health & Safety checked, March 2009
Related experiments
Other practicals on the site explore the structure and function of tissues related to the circulatory system.
Looking at a heartElastic recoil in arteries and veins
There are several practicals on the site that investigate the effects of osmosis on different tissues.
Investigating osmosis in chicken’s eggs
Investigating the effect of blackcurrant squash on osmosis in chipped potatoesInvestigating osmosis, plasmolysis and turgor in plant cells.