Investigating the effect of amylase on a starchy foodstuff
Class practical or demonstration
Place rice in a Visking tubing bag to model food in the gut. Investigate amylase action by adding water, amylase, or boiled amylase to the rice. Leave for 10-15 minutes in a water bath at around 37 °C then test for the presence of a reducing sugar in the water surrounding the Visking tubing bag.
Lesson organisation
This experiment could be done as a demonstration or in groups. Each group needs to set up three Visking tubing bags, so a group of 3 students is ideal.
Apparatus and Chemicals
For each group of students:
3 x 15 cm lengths of Visking tubing
Syringe barrels, sawn off, 3
Boiling tube, 3
Spatula
Test tubes, 6
Test tube racks to accommodate 6 test tubes and 3 boiling tubes per group
Teat pipettes, 6
White dimple (spotting) tile
Beaker, 250 cm3
Kettle for boiling water for Benedict’s test
Eye protection for each student
Marker pen
For the class – set up by technician/ teacher:
Length of Visking tubing, knotted at one end, 15 cm, 3 per group (Note 1)
Syringe barrel, sawn off, 3 per group (Note 2)
Elastic bands, 3 per group
Electric water baths set at 35-40 °C, with thermometer to show temperature accurately
Cooked rice
Iodine solution (Note 3)
Benedict’s reagent (Note 4)
Amylase solution, 5 cm3 per group
(Notes 5 and 6)
Boiled amylase, 5 cm3 per group
Clinistix (as an alternative to Benedict’s reagent) (Note 7)
Health & Safety and Technical notes
Students should wear eye protection when handling chemicals.
Electrical apparatus should be maintained and checked according to your employer’s instructions.
Ensure students know how to deal with breakages of glass or thermometers

1 Soak the Visking tubing in warm water beforehand so it is ready to use.
2 The end of an old syringe makes a convenient support for the Visking tubing, and makes it easier to take samples of the contents with a teat pipette.
3 Iodine solution (See CLEAPSS Hazcard and Recipe card): a 0.01 M solution is suitable for starch testing. Make this by 10-fold dilution of 0.1 M solution. Once made, the solution is a low hazard but may stain skin or clothing if spilled.
4 Benedict’s (qualitative) reagent. (See CLEAPSS Recipe card) No hazard warning is required on the bottle, as the concentrations of each of the constituents are low. Take care making up the reagent; sodium carbonate is an irritant to the eyes and copper(II) sulfate(VI) is harmful if swallowed. See CLEAPSS Hazcards.
5 Amylase solution: Check your amylase supply as many contain starch or reducing sugars, which would interfere with the results of this test. Alpha amylase is bacterial amylase with high activity, and does not give a positive reducing sugar test or starch test. You can use lower concentrations of this enzyme. Some bacterial amylases may survive boiling!
Using saliva: the CLEAPSS Laboratory Handbook provides guidance on precautions, including hygiene precautions, for safe use of saliva as a source of amylase. This has the advantage of being cheaper and technicians do not need to make up fresh solutions each lesson. It is directly interesting to students, and salivary amylase is reliable. It also provides an opportunity to teach good hygiene precautions, including ensuring that students use only their own saliva samples. Provide small beakers to spit into. Students must be responsible for rinsing their own equipment. All contaminated glassware is placed in a bowl or bucket of sodium chlorate(I) for technicians wash up.
6 Working with enzymes: It is wise to test, well in advance, the activity of stored enzymes at their usual working concentrations to check that substrates are broken down at an appropriate rate. Enzymes may degrade in storage, and this allows time to adjust concentrations or to obtain fresh stocks.
7 Clinistix are quick and easy to use. Each stick can be cut into two or three pieces.
Ethical issues
There are no ethical issues associated with this protocol.
Procedure
Preparation
a Prepare boiled rice, enzyme solution, boiled enzyme solution, iodine solution, and Benedict’s reagent.
b Set up a water bath at 37 °C.
c Soak Visking tubing, cut 15 cm lengths (3 per group) and set up model guts with syringe barrels, or leave for students to assemble.
Investigation
d Label 3 boiling tubes 1, 2, 3.
e Label 3 test tubes 1, 2, 3.
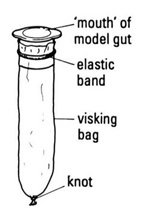
f Set up 3 model guts: take a wet piece of Visking tubing, tie a knot in one end, place the sawn off syringe barrel in the other end and secure with an elastic band. These may have been set up for you (see diagram).
g Use the spatula to add rice to each of the model guts until they are half full.
h Rinse the outside of each piece of Visking tubing under a running tap.
i Place the rice-filled model gut in a labelled boiling tube. Add warm water to boiling tube outside the Visking tubing until it reaches about 2 cm higher than the level of the liquid inside the Visking tubing (see diagram).

j Immediately withdraw one drop of the water you have added and test it with iodine on a dimple tile.
k Add 5 cm3 of water to model gut 1.
l Add 5 cm3 of amylase to model gut 2.
m Add 5 cm3 of boiled amylase to model gut 3.
n Place all the boiling tubes containing the model guts in the water bath at approximately 37 °C.

o Leave for at least 15 minutes.
p While you are waiting:
- Place a grain of rice in a well on the white tile and add a drop of iodine.
- Put some rice in a test tube. Add 2 cm3 of water and 2 cm3 of Benedict’s reagent, and place into a large beaker of boiling water. Check the colour after 2-3 minutes.
- Record your results in a suitable table.
q After 15 minutes, use a teat pipette to remove 2-3 cm3 of the water surrounding the model gut in boiling tube 1.
r Place one drop of this water in a well on the white tile and add a drop of iodine. Record the result.
s Place the rest (around 2 cm3) of the water from boiling tube 1 into test tube 1. Add an equal volume of Benedict’s reagent and place test tube 1 into a large beaker of boiling water. Check the colour after 2-3 minutes. Record the result.
t Repeat steps q, r, s with water from boiling tubes 2 and 3. Record the results.
Teaching notes
The sawn off syringe barrel acts as a model mouth to the gut.
It is a good idea to use cooked rice, as this is real food and can be seen in the (model) gut.
Many students will need help to understand this activity. When interpreting the results, students have to think in terms of two types of model: the model gut with Visking tubing representing the selectively permeable membranes lining the gut wall, and a simplified chemical model of large and small molecules. A further complication is that the movement of chemicals is unseen and only inferred from the results of chemical tests. An additional model could be used, with chicken wire or mesh, fruit or satsuma bags to represent the membrane, and poppet beads in chains to represent starch and singly to represent glucose.
Health and safety checked, September 2008
Downloads
Download the student sheet ![]() Investigating the effect of amylase on a starchy foodstuff (194 KD) with questions and answers.
Investigating the effect of amylase on a starchy foodstuff (194 KD) with questions and answers.
Related experiments
Evaluating Visking tubing as a model for a gut