Investigating mitosis in allium root tip squash
Class practical
Talking about what chromosomes do during mitosis could be very interesting, but seeing them for yourself adds an extra dimension. There are several protocols available for this work and it is notoriously unreliable – often you will not find many dividing cells at all.
This protocol has been tested by the Practical Biology website development team and brings together ideas from SAPS, contributions to the Biotutor discussion list from current teachers, and material from Nuffield Revised Advanced Biology (Longman, 1986).
Lesson organisation
The allium roots need to be prepared 1-10 days in advance of the lesson. Some practitioners report that cutting the root tips around noon makes a difference to the mitotic index, so you may want your technician to cut and ‘fix’ the tips in ethanoic alcohol rather than ask your students to carry out this step.
If you have access to a video microscope it is worth capturing some images, as this procedure can be frustrating.
Apparatus and Chemicals
For each group of students:
Microscope
Water bath at 60 °C
Hydrochloric acid, 1 M, 10-25 cm3 per working group (Note 4)
Scissors
Watch glass (or small dish)
Beaker, 100 cm3, 2
Scalpel
Mounted needle
Microscope slide
Coverslip
Paper towels
For the class – set up by technician/ teacher:
Alliums with sprouting roots – garlic is often recommended, or onions (Note 1)
Ethanoic alcohol (in dropper bottles) – 3:1 absolute ethanol: glacial ethanoic acid (Note 2)
Stain, in dropper bottles, 1 per group (Note 3)
Health & Safety and Technical notes
Take care with ethanoic alcohol, hot hydrochloric acid, and with the stain. Wear eye protection when handling these.
Carry scalpels with care – hold them on a tile as you walk around the laboratory.
1 Garlic cloves are most often suggested as a source of root tips. Fresh garlic will sprout overnight if a clove is supported so that it just touches the surface of some water in a vessel – either by simply inserting the clove firmly into a test tube (or boiling tube) of suitable diameter, or by sticking a cocktail stick through the middle of the clove and supporting on the neck of a wider vessel, or cutting holes in expanded polystyrene sheet and inserting the cloves before floating the polystyrene on the surface.
Set up some roots to sprout 10 days before use, some 5 days before use, some 2 and some 1 day before use so that students can compare the rate of mitosis in young and older root tips.
Some practitioners report that cutting the root tips at close to midday makes a difference to the number of dividing cells, so you may want your technician to cut and ‘fix’ the tips in ethanoic alcohol before use. Roots that have been set to sprout for 2 to 5 days seem to give the highest likelihood of finding actively dividing cells.
Alternatives to garlic include onions, hyacinths or seedlings of beans or peas – as long as they are healthy and fast growing.
2 Ethanoic alcohol (“Farmer’s fluid”) is 3 parts absolute ethanol (highly flammable) to 1 part glacial ethanoic acid (Hazcard 38 A describes this as flammable and corrosive). Mix just before use, adding the acid to the alcohol. You can use ethanol IDA or 95% ethanol instead (Hazcard 40 A – highly flammable and harmful due to the presence of methanol), but chromosomes may not be as clearly defined. Root tips can be kept in this fluid for several months.
3 Stains:
Ethano-orcein stain: Grind 1.5 g of solid orcein (described on Hazcard 32 as low hazard) with a pestle and mortar. In a fume cupboard, mix 90 cm3 of glacial ethanoic acid (Hazcard 38A describes this as flammable and corrosive) with 110 cm3 of distilled water and bring to the boil. Pour the boiling mixture over the orcein and stir very thoroughly (still in the fume cupboard). Leave overnight, then filter and store in a tightly-stoppered dark bottle. If it overstains, dilute with 45% ethanoic acid and try again.
Propionic orcein (made with propionic acid rather than ethanoic) has the advantage that it evaporates more slowly, and is sometimes suggested for this practical.
Toluidine blue – Hazcard 32 describes this as low hazard. Dissolve 0.5 g of solid toluidine blue in 100 cm3 of water.
4 Hydrochloric acid: Hazcard 47A recommends eye protection when working with hydrochloric acid at 1.0 M. If the acid is hot (60 °C) this is especially important.
5 Whichever stain or squashing technique you use, avoid excess stain or pieces of tissue will drift to the edge of the coverslip and be lost. If you introduce too many air bubbles, add more stain after squashing, using a fine dropping pipette.
6 You can delay squashing for several hours. This allows the cells to take up the stain and to harden, which reduces the chance of them bursting.
Procedure
SAFETY:
Ethanoic ethanol is corrosive, so wear eye protection (goggles).
Ethano-orcein stain contains ethanoic acid and also requires you to wear goggles when it is dispensed. You should wear eye protection when handling hot hydrochloric acid.
Take care with scalpels and always carry them on a white tile.
Preparation
a Cut off 1-2 cm of the root tips. Put in a small volume of ethanoic acid on a watchglass (or other shallow dish) for 10 minutes.
b Meanwhile, heat 10-25 cm3 of 1 M hydrochloric acid to 60 °C in a water bath.
c Wash the root tips in cold water for 4-5 minutes and dry on filter paper.
d Use a mounted needle to transfer the root tips to the hot hydrochloric acid (see b) and leave for 5 minutes.
e Wash the root tips again in cold water for 4-5 minutes and dry on filter paper.
f Use the mounted needle to remove two root tips onto a clean microscope slide.
g Cut each about 2 mm from the growing root tip. Discard the rest, but keep the tips (Note 2).
h Add a small drop of stain and leave for 2 minutes (Note 3 and Note 5).
i Break up the tissue with a mounted needle.
j Cover with a coverslip and squash (Note 6) using method A or method B below.
Method A Place the slide and coverslip on a double layer of paper towel and fold the paper over the coverslip. Make certain that the slide is on a flat surface and squash down on the coverslip with a strong vertical pressure, using your thumb. Do not twist or roll the thumb from side to side
Method B Tap the coverslip about 20 times by dropping a wooden mounted needle or a pencil, blunt end down, from a height of about 5 cm onto the middle of the coverslip.
Investigation
k View the root tips under a microscope (x400 magnification) and look for the chromosomes within cells which are actively dividing.
l Locate the meristematic zone, which has small, apparently ‘square’ cells with nuclei which are large relative to the whole cell area.
m If cells are overlapping, squash the slide again. Avoid moving the coverslip from side to side.
n Make sketches of (or take photographs of) cells that show any of the stages of mitosis.
o Calculate the mitotic index.
p Compare the mitotic index of root tips from alliums that have been sprouting for 1, 2, 5 and 10 days.
q If available, compare the allium meristem tissue with that from other species.
Teaching notes
Cell division in flowering plants takes place in particular regions of the plant called meristems. Cells in meristems are not specialized for any particular function and divide repeatedly by mitosis. Some of the daughter cells remain meristematic; others cease dividing and become differentiated into appropriate cell types depending on their position. The root tip meristem is usually a denser white and more rounded than the cut end.
Chromosomes in root tip tissue are made visible with the stain. Dividing cells (if present) will show up clearly with chromosomes in different forms according to the stage of mitosis. Individual chromosomes (as tightly-coiled threads) are visible during anaphase.
The links between the cellulose walls of plant cells are broken down by the treatment with hydrochloric acid. This ensures that the stain can penetrate the cells and allows the tissue to be squashed out one cell thick.
The mitotic index is calculated like this:
![]()
The duration of each stage of mitosis has been recorded and the data (see table below) could be used to compare the observed frequencies of the different stages as recorded by students.
| Stage | Observed occurrence in representative microscope fields | Duration | ||
| number of cells | % of total cells | minutes | % of total time | |
| Prophase | 216 | 85.0 | 71 | 85.0 |
| Metaphase | 17 | 6.7 | 6.5 | 7.7 |
| Anaphase | 8 | 3.3 | 2.4 | 2.9 |
| Telophase | 13 | 5.1 | 3.8 | 4.4 |
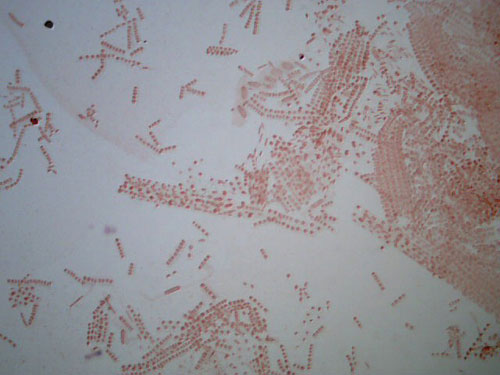
These two images show the view that is typical when exploring an allium root tip squash. These slides are of root tips that were cut and fixed after 2 days of growing.
The first is a low power image, and the second a high power close up of a portion of the same slide.


Web links
http://www-saps.plantsci.cam.ac.uk
This link is to the home page of the Science and Plants for Schools (SAPS) website with links to their teaching resources. (Website accessed October 2011)