Investigating turn alternation behaviour of woodlice
Class practical
This investigation is concerned with a causal explanation of the behaviour shown by woodlice in a maze. At some points the animals must make a forced turn, and at others they have a free choice. Their behaviour is noted and, in analysing the results, we try to describe a pattern linking the forced turns and the choice when a free turn is possible.
Lesson organisation
If woodlice are in short supply, use fewer for each group and pool the results for stage 3.
Apparatus and Chemicals
For each group of students:
Woodlice (Note 1)
Maze (Note 2)
Paintbrush, similar in width to a woodlouse
Stopclock/ stopwatch
Health & Safety and Technical notes
Take sensible hygiene precautions after handling woodlice and the soil in which woodlice have been kept.
1 Porcellio scaber is recommended, though other species of woodlouse should also be suitable. Woodlice that fail to move or stop completely in the maze should also be rejected. If you are unsure how to identify Porcellio scaber, use the key on the Natural History Museum’s website (www.nhm.ac.uk/woodlice/key.html)
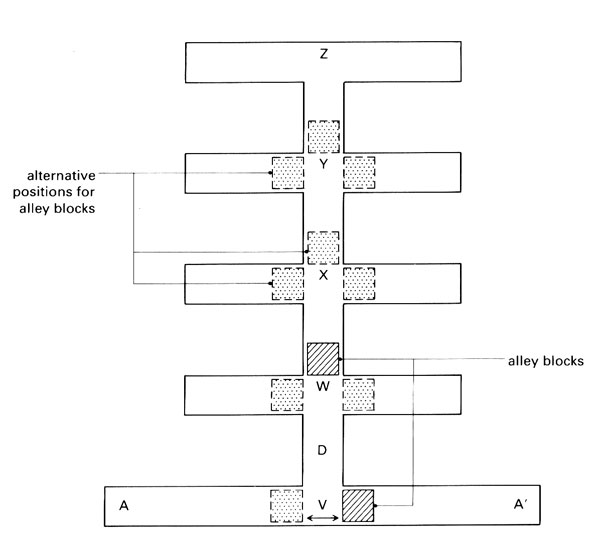
2 Make the maze by milling a track in Perspex and blocking the alleys with polystyrene blocks. The width of the maze is designed for woodlice of average size, so reject any very large or very small ones. The alleys of the maze in the diagram are 8 mm wide; the maze is 20 cm long (between points V and Z), and 20 cm wide (between points A and A’). Alternatively, copy the maze template from the ASAB website (see link below) to make a card maze, or construct your own maze design along similar lines.

3 The CLEAPSS Guide L56 Housing and keeping animals gives the following information about woodlice. Woodlice survive in any reasonably-sized container such as an old aquarium or trough full of moist soil and leaf litter. Keep the container covered to exclude light and retain moisture. Place it in a relatively cool and sheltered place out of direct sunlight.
Keep the soil moist but not waterlogged. Put a variety of stones, pieces of bark and rotting wood on top of the soil – this makes places for the woodlice to colonise. If kept outdoors, such an environment will often become naturally colonised by woodlice. However, if this does not happen, or the animals are intended for use in choice-chamber work, it is worthwhile ‘seeding’ it with individuals of the same species – the animals should look the same! Then bring the container and contents indoors to prevent further colonisation.
Add food at intervals: plant material such as potato, carrot and other root vegetables cut up into medium-sized pieces. Add a lump of cuttlefish or chalk (natural, not blackboard chalk) to the soil to provide a supply of calcium carbonate.
Where your school has an environmental area, placing pieces of wood, bark or stone on the soil will encourage colonisation by woodlice. This will provide a source of material for observation as well as extending the range of microhabitats in the area.
Ethical issues
Teachers should be careful to introduce woodlice in a way that promotes a good ethical attitude towards them and not a simply instrumental one. Although they are simple organisms which may not 'suffer' in the same way as higher animals, they still deserve respect. Animals should be returned promptly to their natural environment or a suitable holding tank after being tested in the maze. This supports ethical approaches in field work where animals are returned to their habitat after observations have been made.
Procedure
SAFETY: Take sensible hygiene precautions after handling woodlice and the soil in which woodlice have been kept.
Preparation
a Collect some woodlice. You’ll find them amongst leaf litter, in rotting wood and under terracotta pots. Make air holes in a plastic tub to collect them with a little garden compost and some leaves and twigs (Note 3).
b Set up the maze (Note 2).
c Keep the illumination of the maze constant by using a bench lamp, always the same distance from the maze and in the same position.
Investigation
d Place the alley blocks so as to force a turn to the left or a turn to the right at point V. Allow free turns at points W, X, Y or Z.
e When you test the woodlice in the maze, start half the animals at position A and the other half at A’. Test each woodlouse once only, then set it aside for later investigations.
f Handle the woodlice using a plastic teaspoon and a paint brush, trying to disturb the animals as little as possible. Place the first woodlouse at A, with alley blocks in position to allow the free turn at point W. Record the choice made at W as ‘same direction’ (S) or ‘opposite direction’ (O), comparing with the direction of the forced turn.
g Repeat, starting the second woodlouse at A’, the third at A and so on, changing the position of the alley block at V accordingly.
h Perform at least 40 trials.
i Place additional alley blocks to make the free turn happen at W, X, Y or Z. For example, to allow a free turn at X, the side arms at W must be blocked. In this way you can increase the distance between the forced turn and the free turn.
j Test 10 woodlice for each distance, again starting alternately from A and A’, recording choices as S (same direction) or O (opposite direction). Record the time taken for each woodlouse to move from point V to the free turn point.
k Calculate the median times for the woodlice to travel distances WX, WY and WZ in stage j. If the results are recorded in Excel, the easiest way to find this value is to ‘sort’ the data according to time, and then find the result half way down the table.  Spreadsheet for recording results (19 KB). The first sheet in this workbook will count the total number of S turns and O turns for you. The second sheet is set up to take the data for a chi-squared test.
l Return the alley blocks to the original position shown in the diagram.
m Delay the woodlouse at point D by applying an artist’s brush to its dorsal surface. This has the effect of varying the time elapsing between the forced and free turns, while the distance travelled remains the same. Delay the woodlice for times equal to the median times. Test 10 woodlice for each period of delay, including 10 that receive no delay.
n Pool the class results; add up the total number of S and O choices made in each part of the investigation.
o Use the ?2 test ('chi-squared' test) to see whether the proportion of S and O choices is significantly different from that expected by chance (i.e. 50 %).
p Draw graphs of the percentage O choices against distance between the forced and free turns, and against delay period between the forced and free turns.
Teaching notes
This investigation is based on the ideas that:
- the direction a woodlouse turns is influenced by the direction of the previous turn
- the influence is such that a woodlouse is more likely to turn in the opposite direction from that of the previous turn.
- the influence of one turn on the next is reduced if the distance between the turns is increased.
To use a ?2 test for these hypotheses, you need to develop a ‘null hypothesis’ for each test. This would be: 'The direction a woodlouse turns is NOT influenced by the direction of the previous turn, regardless of the direction of the previous turn, or the distance, or the time between turns.'
![]()
There is one degree of freedom in this test. As the number of trials is fixed, if a turn is not S, it is O. From a ?2 table find the probability that the null hypothesis is supported.
Health & Safety checked, May 2009
Downloads
Download an ![]() Excel spreadsheet for recording results (19 KB).
Excel spreadsheet for recording results (19 KB).
Web links
www.nhm.ac.uk/woodlice
This is the home page for the Natural History Museum’s ‘Walking with woodlice’ project from 2004. It includes a key for identifying woodlice, so this is a good place to start if you are not sure what Porcellio scaber looks like.
(Websites accessed October 2011)


